Convert Bubble.io User Signups to Mailchimp Subscribers via API Connector
I’ve been using Mailchimp for years now for all my projects. Instead of always sending an email from the interface, I can use the Mailchimp Marketing API to create a campaign.
If you have an existing account with Mailchimp and your platform is built on Bubble, then you might have been in my shoes - connecting your Mailchimp account to Bubble is not as simple as ‘drag-and-drop’.
Here’s what we want to achieve: Subscribe all new user signups to your Mailchimp list.
Get your Mailchimp API Key
You can authenticate requests using either your Mailchimp API key or an OAuth access token. The API makes it easy to integrate Mailchimp's features into other applications. Generally, you should create a new API Key for each service you're connecting to Mailchimp.
Here’s how you can generate one for yourself:
- Navigate to the API Keys section of your Mailchimp account. In the Mailchimp interface, your Mailchimp API key can be found by clicking on your profile avatar in the bottom left > Account > Extras > API Keys.
- If you already have an API key listed and you’d like to use it for your application, simply copy it.
Otherwise, click Create a Key and give it a descriptive name that will remind you which application it’s used for.
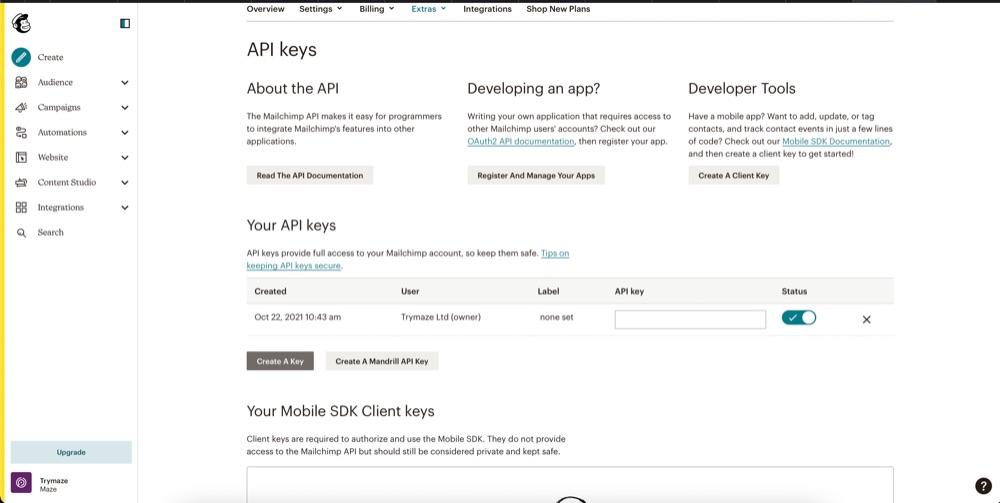
Mailchimp Marketing API provides access to Mailchimp data and functionality, allowing developers to build custom features to do things like sync email activity and campaign analytics with their database, manage audiences and campaigns, and more.
Install and Setup Mailchimp plugin
Bubble is an extensible platform. You can install plugins from the directory.
First, you need to install the Mailchimp official plugin. To install the plugin, visit the plugin page and select your app from the dropdown menu.
After installing the plugin from the plugins gallery, you need to obtain your Mailchimp API key and input it into the plugin's settings.
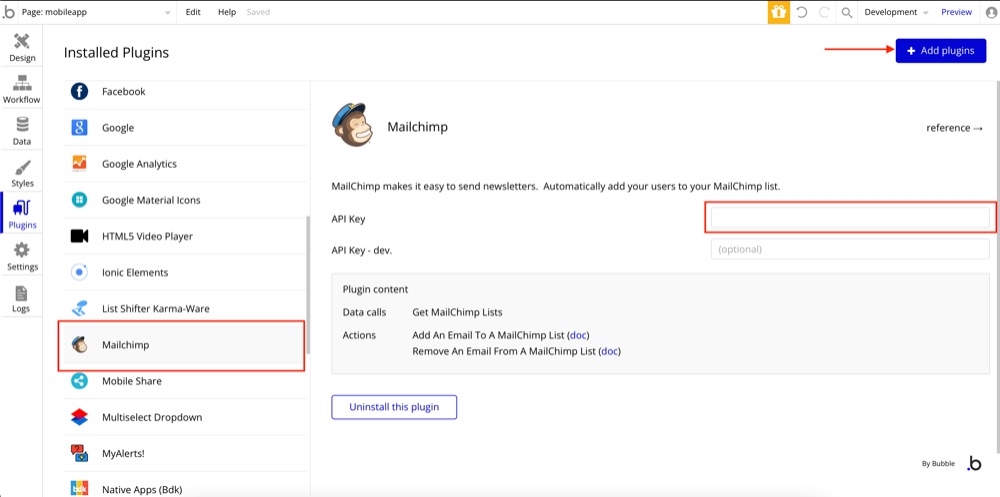
The Mailchimp plugin allows you to add or remove users from your Mailchimp mailing lists from your workflows.
Create a workflow to Add or Remove an email to a MailChimp list
The `Add` action adds an email to an email list defined in Mailchimp. The `Remove` action removes an email from an email list defined in Mailchimp.
Email address: Define the email to add or remove to/from the list.
List name: After entering your keys in the Mailchimp section in the Plugins Tab, Bubble will fetch the list you created with Mailchimp to populate this list. Select the list to add or remove the user to.
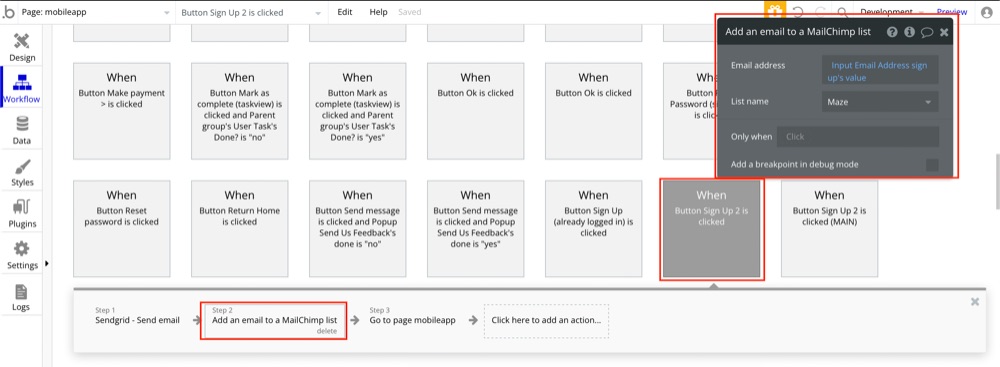
Mailchimp Plugin Restriction
However, there is a restriction with this plugin: You can add users to a Mailchimp list but not the first name or other dynamic tags. This can be problematic especially when you want to use Merge Tags. Mailchimp offers merge tags for all kinds of dynamic information. Paste a merge tag into your email campaign to add personalized or dynamic content.
Bubble API connector
You can use the Bubble API connector and the MailChimp API.
To add users to your Mailchimp list with the appropriate tag so that they receive target emails sent to them, access the documentation. Mailchimp documentation: https://mailchimp.com/developer/marketing/api. Set up tags in your Mailchimp account so that when people signup they get automatically tagged and start receiving marketing emails.
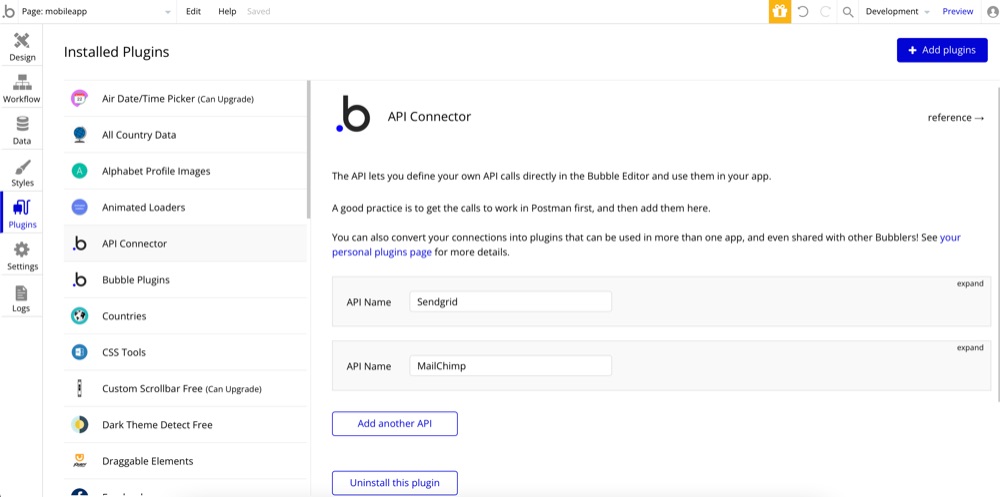
API Structure: Find your data center
The root url for the API is https://<dc>.api.mailchimp.com/3.0/. The <dc> part of the URL corresponds to the data center for your account.
Note: Make sure to replace the
<dc>placeholder in your code with the data center subdomain for your account, or your request may generate an error. For example, if the data center for your account isus6, all API endpoints for your account are available relative tohttps://us6.api.mailchimp.com/3.0/.
There are a few ways to find your data center.
- It’s the first part of the URL you see in the API keys section of your account; if the URL is
https://us6.mailchimp.com/account/api/, then the data center subdomain isus6. - It’s also appended to your API key in the form key-dc; if your API key is
0123456789abcdef0123456789abcde-us6, then the data center subdomain isus6.
Authenticate with an API key
You can either use HTTP Basic Authentication or Bearer Authentication. You can check the role for an API key using the API Root endpoint.
HTTP Basic Authentication:
curl --request GET \
--url 'https://<dc>.api.mailchimp.com/3.0/' \
--user 'anystring:TOKEN
Bearer Authentication:
--url 'https://<dc>.api.mailchimp.com/3.0/' \
--header "Authorization: Bearer <TOKEN>"
Next, call the API root directory to return details about the Mailchimp user account. In this case, we’re managing members of a specific Mailchimp list, including currently subscribed, unsubscribed, and bounced members.
-
List members info
GET/lists/{list_id}/membersGet information about members in a specific Mailchimp list.
-
Add member to list
POST/lists/{list_id}/membersAdd a new member to the list.
-
Get member info
GET/lists/{list_id}/members/{subscriber_hash}Get information about a specific list member, including a currently subscribed, unsubscribed, or bounced member.
-
Add or update list member
PUT/lists/{list_id}/members/{subscriber_hash}Add or update a list member.
-
Update list member
PATCH/lists/{list_id}/members/{subscriber_hash}Update information for a specific list member.
-
Archive list member
DELETE/lists/{list_id}/members/{subscriber_hash}Archive a list member. To permanently delete, use the delete-permanent action.
-
Delete list member
POST/lists/{list_id}/members/{subscriber_hash}/actions/delete-permanentDelete all personally identifiable information related to a list member, and remove them from a list. This will make it impossible to re-import the list member.
What is subscriber_hash?
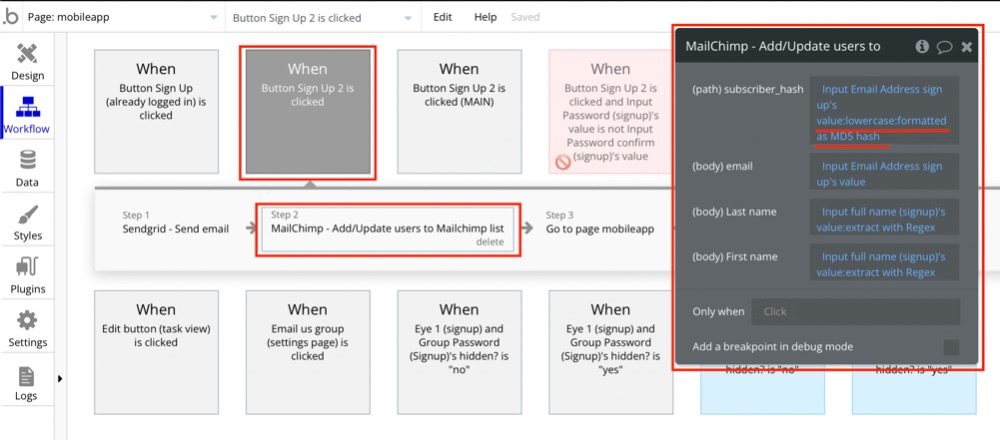
Subscriber_hash is the MD5 hash of the lowercase version of the list member's email address. This endpoint also accepts a list member's email address or contact_id. To make an MD5, use the operator :formatted as and then choose MD5 in Bubble.
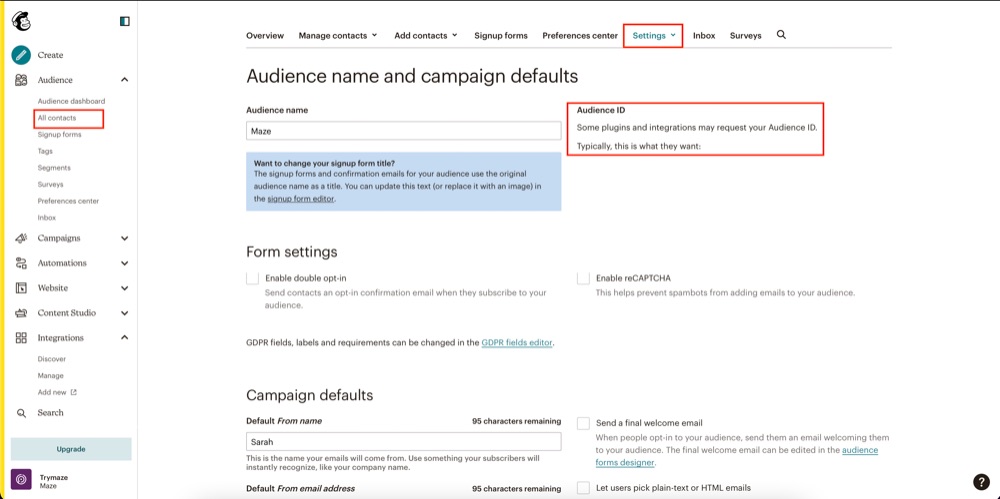
What is `list_id`?
The unique ID for the list. Each Mailchimp audience has a unique audience ID (sometimes called a list ID) that integrations, plugins, and widgets may require to connect and transfer subscriber data. To find your audience ID, follow these steps: Audience > All contacts > Current audience > Settings > Audience name and defaults.
Map the API field on Bubble API Connector
Remember to enter the values for Authorization, list_id and subscriber_hash keys.
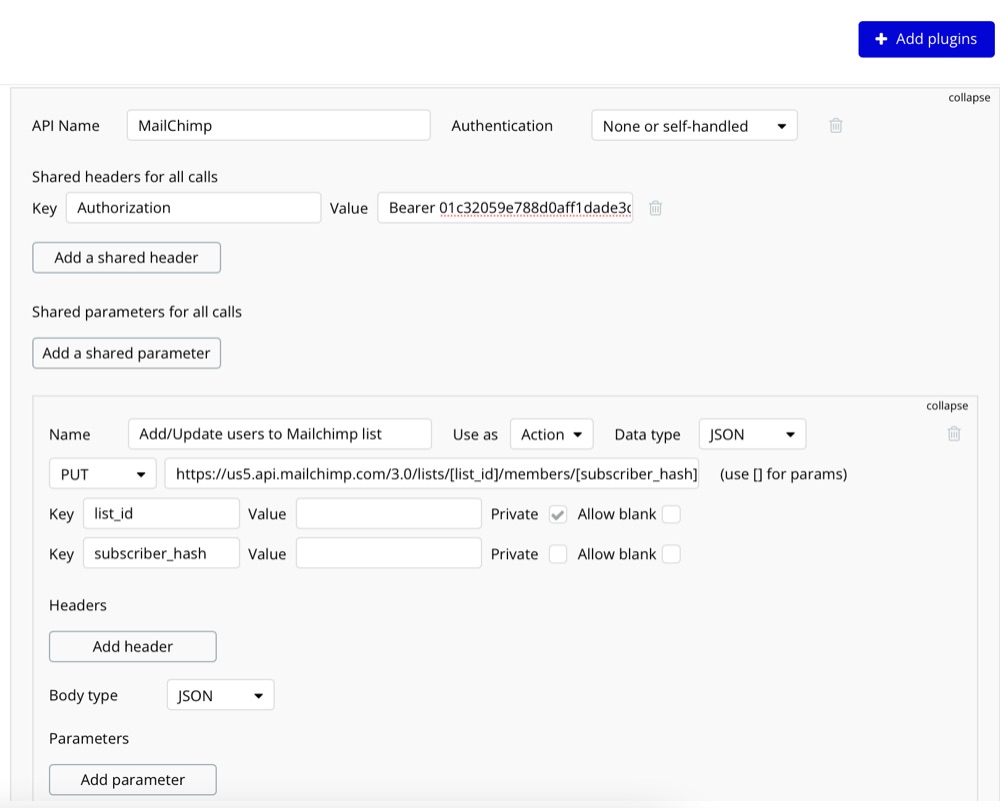
Any sensitive parts of the call, especially secrets / tokens, should be in fields marked "Private".
Body (JSON object, use <> for dynamic values):
{
  "email_address": "",
  "status_if_new": "subscribed",
  "email_type": "",
  "status": "subscribed",
  "merge_fields": {},
  "interests": {},
  "language": "",
  "vip": false,
  "location": {
    "latitude": 0,
    "longitude": 0
  },
  "marketing_permissions": [],
  "ip_signup": "",
  "timestamp_signup": "",
  "ip_opt": "",
  "timestamp_opt": ""
}
If you use dynamic values, update the values:
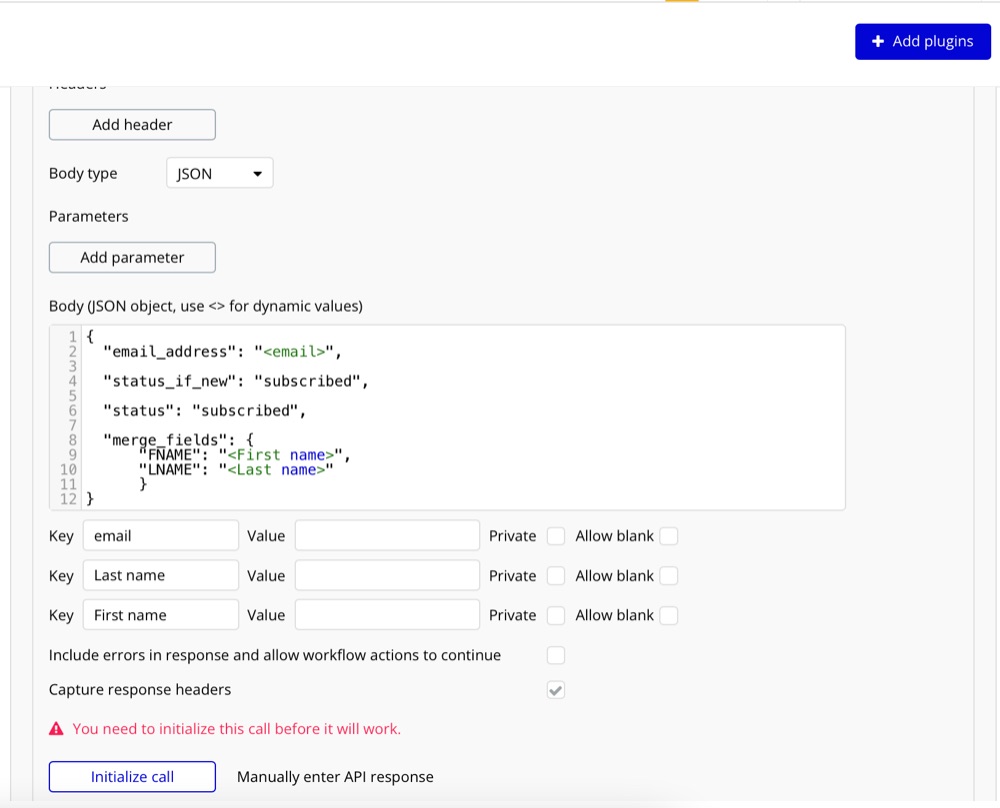
Once your audience is configured with the fields you need, you can add data to those fields in the merge_field dictionary when adding a contact.
Finally set up a Bubble workflow
Trigger: When a user signs up
Action: Add/Update users to your Mailchimp list
For more details on how to query Marketing API endpoints, see Methods and Parameters. For troubleshooting API calls, see the Errors docs.
Alternative Solution
If you aren’t familiar with setting up API’s, use the Mailchimp Extended plugin on Bubble, by Coaching No Code Apps to manage campaigns and subscriber lists.
ABOUT ME
I'm Juliet Edjere, a no-code professional focused on automation, product development, and building scalable solutions with no coding knowledge.
Learn from practical examples and explore the possibilities of no-code, AI and automation. We'll navigate the tools, platforms, and strategies, one article at a time!
Visit my website → built with Carrd