How to convert data list in Bubble to a clean JSON array (no plugin)
So, you're deep into a Bubble project. You've designed your database, and your UI is looking great. Then, you hit a snag. You need to take a list of things from your database and send it to an external API, a charting library, or just display it as raw JSON for debugging.
You jump into the workflow editor, add a `"Do a search for..."`, and start looking for `...:format as JSON`. You scroll, you click, you squint. It's not there. You can format a single item as JSON, but a whole list? Natively, in the frontend? Not so much.
I've been there. You start thinking you'll need a complex plugin or have to loop through things one by one, which feels slow and clunky.
There's a clean and native way to solve this, with a combination of a Backend Workflow and `:formatted as text` operator.
Let's walk through it, step by step.
The setup
First, let's define what we're trying to do. We have a "Product" data type in our Bubble app. We want to click a button and generate a clean JSON array of all our products, ready to be used anywhere.
Our "Product" data type looks something like this:
- Name (type: text)
- Category (type: text)
- Features (type: list of texts)
- Price (type: number)
- In Stock (type: yes/no)
Our goal is to produce a JSON string that looks like this:
[
  {
    "name": "Quantum Keyboard",
    "category": "Peripherals",
    "features": ["Mechanical Switches", "RGB Lighting", "Braided Cable"],
    "price": 129.99,
    "in_stock": true
  },
  {
    "name": "Photon Mouse",
    "category": "Peripherals",
    "features": ["Lightweight", "Wireless", "High DPI"],
    "price": 79.50,
    "in_stock": false
  }
]
It's a proper array of objects.
Step 1: Create the backend
The heavy lifting will happen on Bubble's server side, which is faster and more robust for this kind of data manipulation.
- Go to the Backend workflows section of your editor. (If you don't see it, you need to enable it first. Go to Settings > API and check the box that says "Enable Workflow API and backend workflows".)
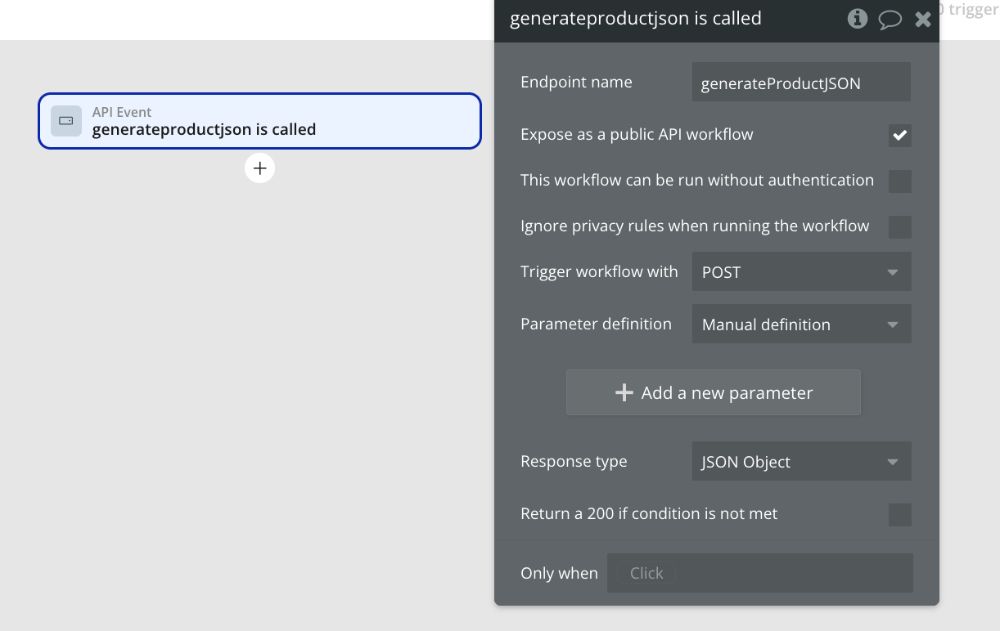
- Click to create a New API Workflow. Let's name it `generateProductJSON`.
- In the settings for this new workflow, check the box for "Expose as a public API workflow." This allows us to call it from our app's frontend. Don't worry, "public" doesn't mean anyone can use it; we can add privacy rules. For now, we'll uncheck "Run without authentication" for simplicity.

Step 2: Craft the JSON with `:formatted as text`
This is where the real trick comes in. We're going to add a single action to our `generateProductJSON` workflow.
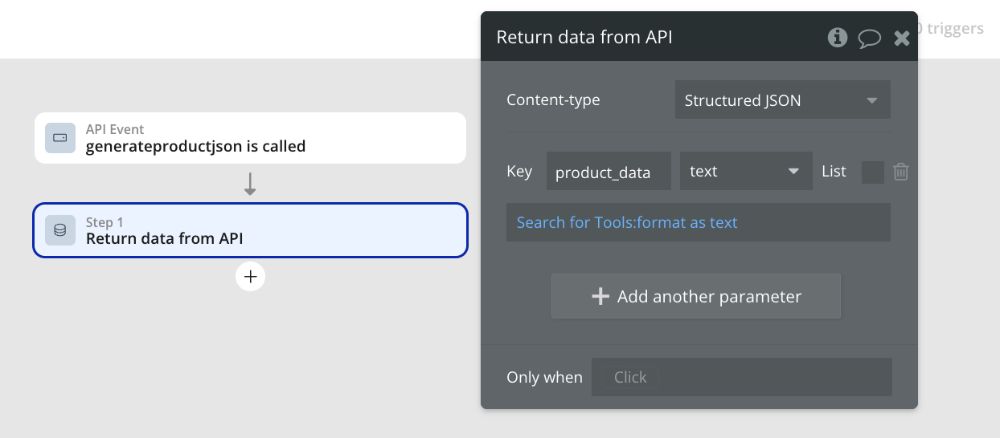
- Click to add an action and choose Data (Things) > Return data from API.
- This action is designed to send raw text or JSON back to whatever called the workflow.
- We need to define a "key" for our data. Think of it as a label. Let's call it `product_data`.
- Now for the Value field. This is where we'll build our JSON string. It might look a little intimidating at first, but let's break it down.
First, we start with a search for all our products: `Do a search for Product`
Next, we add the operator that makes this all possible: `:formatted as text`.
This operator iterates through every single item in our list and lets us create a custom text string for each one, with a delimiter separating them.

This opens up two new fields:
- Content to be formatted: This is where we build our JSON object template for a single product.
- Delimiter: This is what separates each object. For a valid JSON array, we need a comma. So, just type a comma `,` here.
Now, let's build the template in the "Content to be formatted" box. This part is important, and getting the syntax right is key.
{
  "name": "This item's Name:formatted as JSON-safe",
  "category": "This item's Category:formatted as JSON-safe",
  "price": This item's Price:formatted as JSON-safe,
  "in_stock": This item's In Stock:formatted as text:formatted as JSON-safe,
  "features": ["This item's Features:join with ",":formatted as JSON-safe"]
}
Let's dissect that template, because every little quote and bracket matters:
- Text fields (name, category): These are simple. We wrap the dynamic expression This item's Name in double quotes " ".
- Number fields (price): JSON numbers should not be in quotes. So we just put This item's Price directly.
- Yes/No fields (in_stock): A Bubble yes/no value needs to be converted to the text true or false. We do this with `:formatted as text`. For "Formatting for yes," type true. For "Formatting for no," type false.
- List of texts (features): We need to create a JSON array of strings. We do this by using the `:join` with operator. The delimiter here must be "," (a quote, a comma, and another quote) to correctly separate the items inside the array. Then, we wrap the whole thing in square brackets `[ ]` inside the main quotes.
- :formatted as JSON-safe: This operator sanitises a text string, date, yes/no, or list of texts into a JSON-acceptable format by escaping characters (adding a \ so it is not recognised) that would otherwise break expected JSON formatting. This includes characters like line breaks, double quotations, or tabs. Bubble uses the `JSON.stringify()` method in the backend.
Getting the quotes right is 90% of the battle. Remember: Text values in JSON need quotes. Numbers and booleans (true/false) do not. An array of strings needs quotes around each item inside it.
We're almost there.
The expression we just built will produce this: `{...},{...},{...}`. It's a series of objects separated by commas, but it's not a valid JSON array yet because it's missing the opening and closing square brackets `[ ]`.
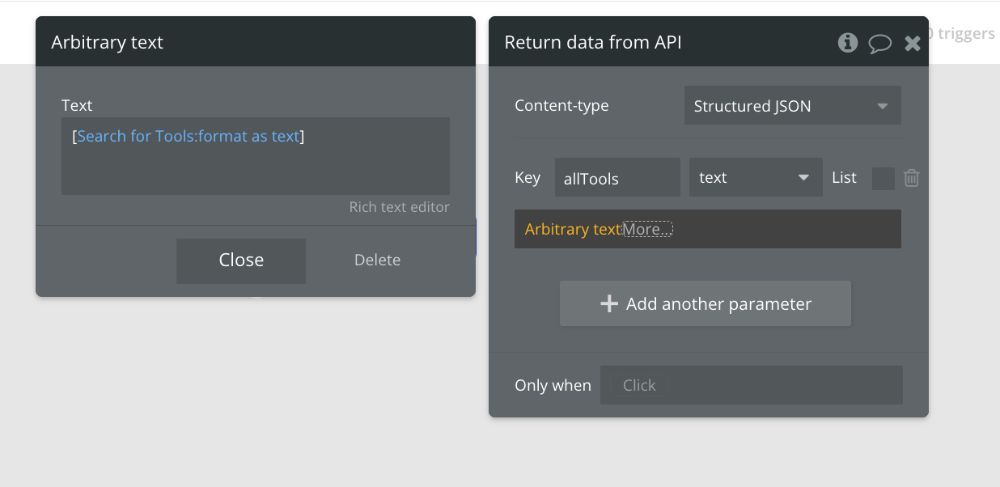
So, in the main Value field for our Return data from API action, we'll manually wrap our expression:
`[Do a search for Product:formatted as text]`
You literally just type a `[` at the beginning and a `]` at the end. Your final expression in the Value box should look like this:

Use Arbitrary text to manually enter a static or dynamic string of text. The text entered will resolve to type
Textand can be further modified with any of the text type operators.
Step 3: Triggering it from the frontend
Now let's go back to our main page.
-
Add a button and label it something like "Generate Product JSON."
-
Start a workflow from this button.
-
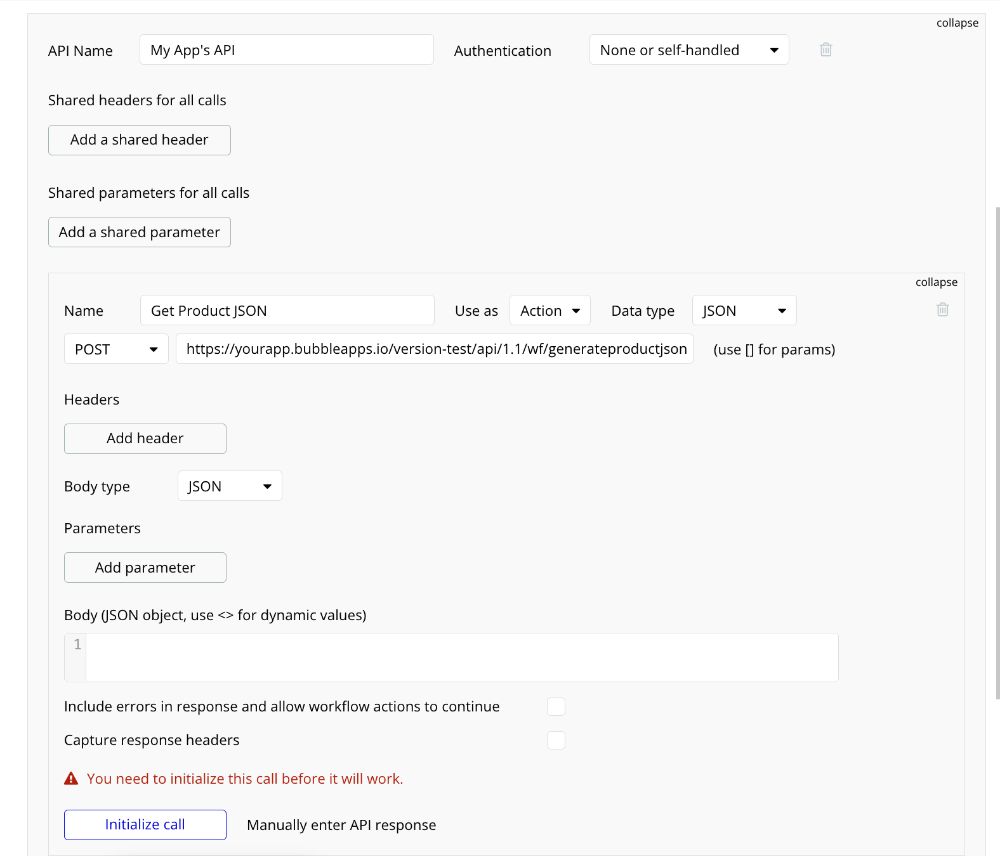
To call a backend workflow and get data back immediately, we need to use the API Connector plugin to call our own app's API.
- If you haven't already, install the free, official API Connector plugin.
- Create a new API, call it "My App's API".
- Create a new API call, name it "Get Product JSON”.
- Set Use as to Action.
- Set the method to POST.
- The URL will be your backend workflow's URL. You can find this in the Backend Workflows editor for
generateProductJSON. It looks like `https://yourapp.bubbleapps.io/version-test/api/1.1/wf/generateproductjson`. - In the "Body" section, leave it blank or as {}.
- Click "Initialize call." If it works, Bubble will show you the `product_data key` and the JSON you created. Save it.
-
Now, back in your button workflow, add an action: Plugins > My App's API - Get Product JSON.
-
The JSON is now available as the `Result of Step 1's product_data`. You can display it in a text element, save it to a custom state, or pass it to another API call.

And that's it!
You've successfully built a system to search for any data in your app and format it as a perfect JSON array, all without a single third-party plugin. You now have a reusable "engine" on your backend that you can call from anywhere in your app to get freshly formatted data on demand.
ABOUT ME
I'm Juliet Edjere, a no-code professional focused on automation, product development, and building scalable solutions with no coding knowledge.
Learn from practical examples and explore the possibilities of no-code, AI and automation. We'll navigate the tools, platforms, and strategies, one article at a time!
Visit my website → built with Carrd

