How to create and use JSON data in the same Bubble backend workflow
You want to take that freshly created JSON in Bubble's backend and immediately send it to an external API—maybe to a shipping provider, a charting service, or a data warehouse. You click "Add an action..." and then you hit the wall.
How do you actually use the data you just created in the next step?
If you've ever felt stuck here, you're not alone. It's a common roadblock. You might have considered clunky workarounds, like saving the JSON to a temporary field in your database or scheduling another API workflow to run a second later. These work, but they feel inefficient and add unnecessary complexity.
There's a much cleaner and native way to handle this. The secret is to use Backend Custom Events to create a seamless, multi-step process.
Let's walk through how to build a modular backend workflow that can create complex data and immediately use it, all in one go.
Our goal: The create-and-process pattern
We want to build a backend workflow that performs two distinct jobs in a single run:
- Create: Search for a list of "Products" in our database and format them into a clean JSON array.
- Process: Immediately take that JSON array and send it as the body of an API call to an external service (e.g., a "Shipping Label API").
To do this cleanly, we'll split our logic into two interconnected parts: a main "creator" workflow and a "processor" helper workflow.
Step 1: Build the "Processor" as a custom event
First, we'll create the part of our system that knows what to do with the data. This will be a reusable Custom Event.
-
Navigate to the Backend workflows section in your Bubble editor.
-
Click the box to add a new workflow, but instead of "New API Workflow," choose New custom event...
-
Let's give it a clear name that describes its job, like `processProductJSON`.
-
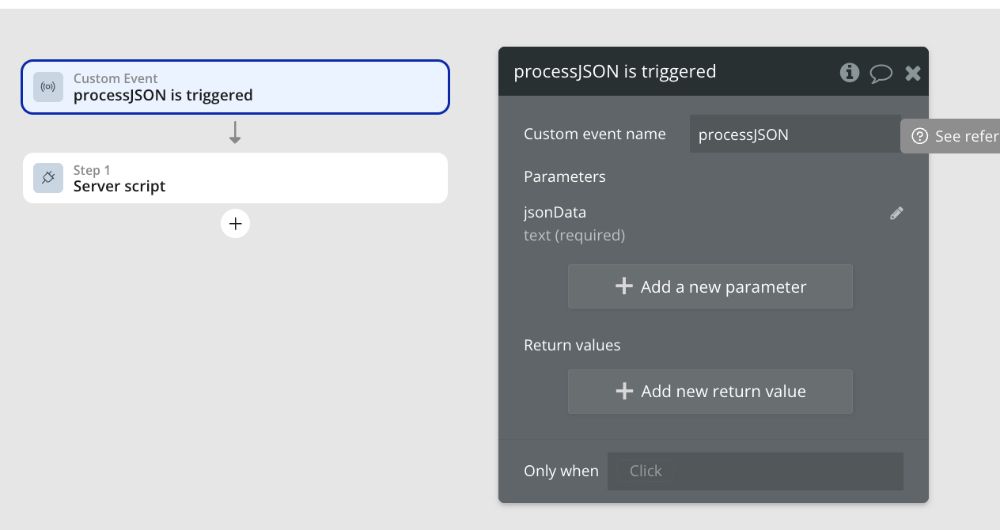
Now, the most important part: we need to tell this event what kind of data it should expect to receive. We'll define a parameter to act as an input bucket.
- Click on 'Click to add a parameter...'
- For the Key, let's call it jsonData.
- For the Type, set it to text, since our JSON array will be a string of text.
Your custom event setup should look like this:

Now, you can build the "process" part of the logic inside this event. Add an action, like Plugins > API Connector > [Your External API Call]. In the JSON/Body section of that API call, you can now dynamically use the data that was passed into this workflow:
`This Workflow's jsonData`
This custom event is now a self-contained, reusable "processor." You can trigger it from anywhere in your app and feed it a text string, and it will perform its action.
Step 2: Build the "Creator" as the main workflow
Next, we'll build the initial API workflow that creates the data and hands it off to our processor.
- In the same Backend workflows editor, create a New API Workflow. Let's name it `generateAndProcessProducts`.
- This workflow will have one primary job: generate the JSON and trigger our custom event.
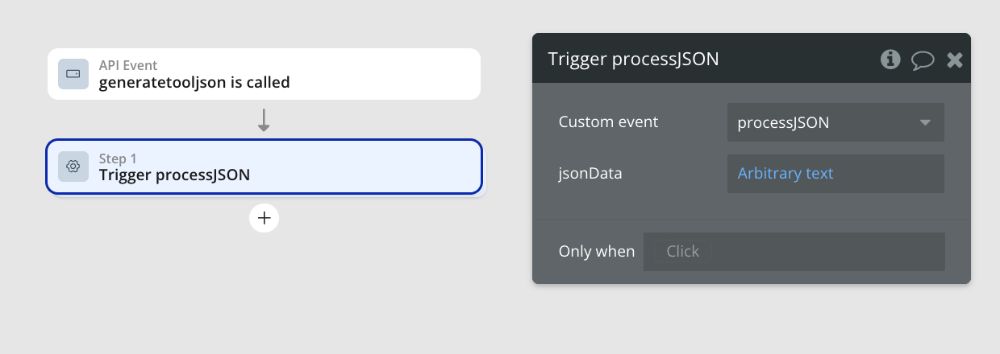
- Add an action: Custom Events > Trigger a custom event.
- In the workflow action panel, select your `processProductJSON` event from the Custom event dropdown.
- As soon as you select it, the `jsonData` parameter we defined earlier will appear, waiting for input. This is where we put our data-creation logic.
In the `jsonData` field, we'll use the `:formatted as text operator` to build our JSON string. For a Product data type with fields like Name (text), Price (number), and Features (list of texts), the expression would look like this:
`[Do a search for Product:formatted as text]`
When you click on `:formatted as text`, you'll configure it like so:
-
Content to be formatted:
{ "name": "This item's Name", "price": This item's Price, "features": ["This item's Features:join with ",""] } -
Delimiter: `,` (a single comma)
Your final "Trigger a custom event" action should look something like this:

And that's it!
How it all works together seamlessly
When you run the main `generateAndProcessProducts` workflow (whether you trigger it from your app's frontend or another backend process), here’s the elegant sequence of events:
- Step 1 of the main workflow executes. It searches your database for all Products and uses the `:formatted as text` expression to compile them into a single, perfectly structured JSON text string.
- It immediately triggers the `processProductJSON` custom event, passing" that complete JSON string into the `jsonData` parameter.
- The `processProductJSON` workflow instantly fires and begins its actions, using the `This Workflow's jsonData` that it just received to make the external API call.
You've successfully created a complex piece of data and used it in a subsequent step, all within a single, efficient backend operation. There are no messy API calls back to your app, and no need to temporarily clog your database with data that's only needed for a moment.
By mastering this create-and-process pattern, you've unlocked a cleaner, more modular, and highly scalable way to handle complex backend logic in Bubble.
ABOUT ME
I'm Juliet Edjere, a no-code professional focused on automation, product development, and building scalable solutions with no coding knowledge.
Learn from practical examples and explore the possibilities of no-code, AI and automation. We'll navigate the tools, platforms, and strategies, one article at a time!
Visit my website → built with Carrd

