How to track input changes in Bubble custom state to update a list
When a user changes a selection in a dropdown menu, we want to update a list of items stored in the browser's localStorage. To do this, we need to know two things: the item that was selected (the old value) and the item that is now selected (the new value). We will then use these two values in our JavaScript to perform a "find and replace" operation on our list.
Bubble.io workflows know the dropdown's new value when it's changed, but they don't automatically remember the previous value. We need to create our own "memory" for this.
We will use a Custom State as a temporary storage spot on the page. When the dropdown changes, we'll read the value from our sticky note (the old value), use it, and then update the note with the new value for next time.
Step 1: Create a custom state to "remember" the value
-
In the Bubble editor, make sure no element is selected. You should see the properties for the page itself in the inspector panel.
-
Click the "i" icon (Inspector) at the top of this panel.
-
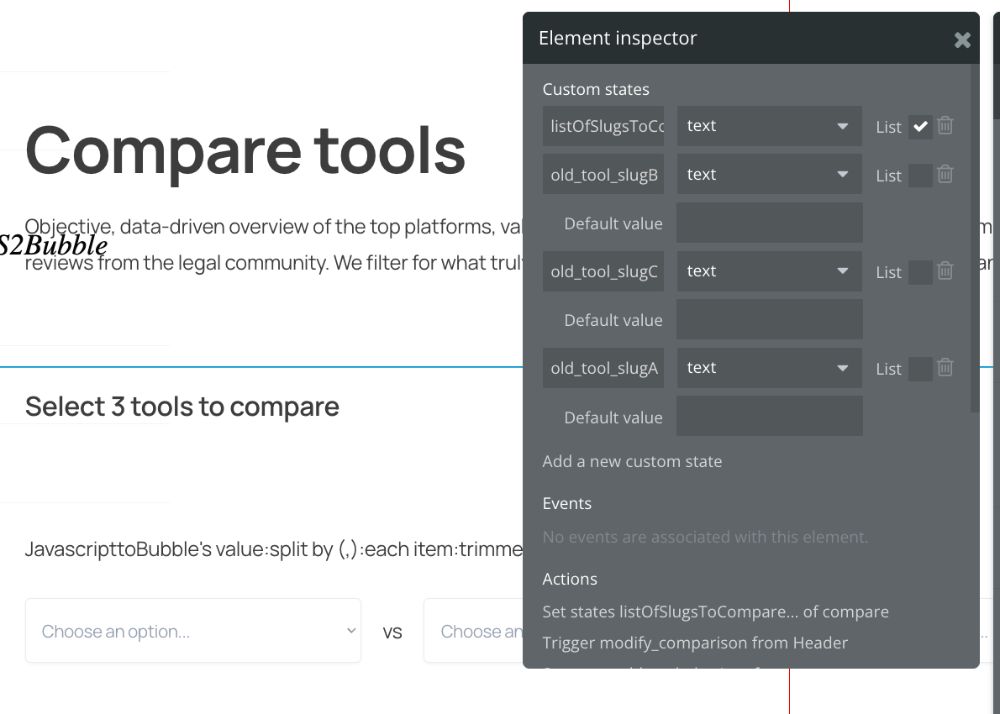
You will see a section for "Custom states". Click "Add a new custom state".
-
A popup will appear. Let's configure it:
- State name: Give it a clear, descriptive name.
previous_tool_slugis perfect. - State type: Set this to text, as we are storing a tool's slug.
- State name: Give it a clear, descriptive name.
-
Click "Create".
You've successfully created a temporary variable on your page named previous_tool_slug.

Step 2: Set the initial value
When the page loads, our custom state is empty. We need to give it its first value as soon as the dropdown is populated.
-
Navigate to the "Workflow" tab.
-
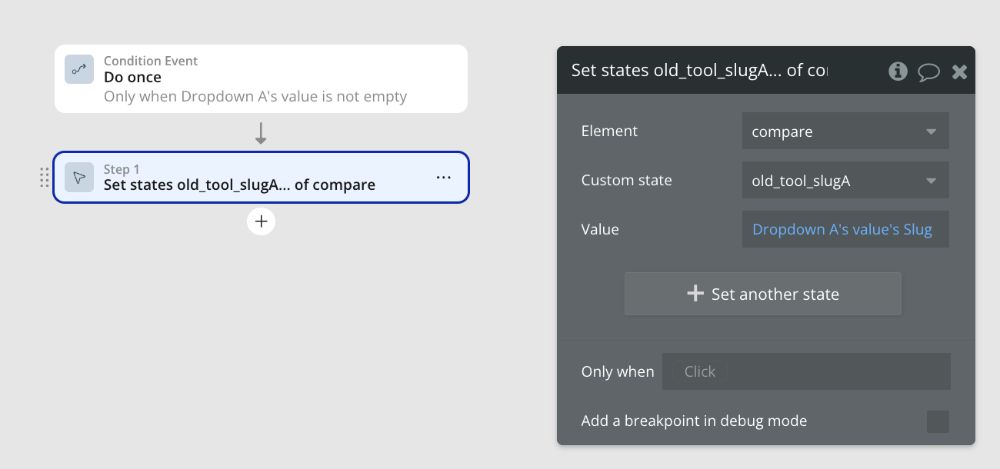
Click "Click here to add an event..." and choose "General" -> "Do when condition is true".
-
Set the condition: This Dropdown's value is not empty. (Replace "This Dropdown" with the actual name of your dropdown element).
-
Important: Check the box for "Run this: Once". This ensures the workflow only runs one time to get the very first value, not every time it changes.
-
Now, add an action to this workflow: "Element Actions" -> "Set state".
-
Configure the action:
- Element: Select the page itself (e.g., pagename).
- Custom state: Choose the
previous_tool_slugstate you just created. - Value: Set this to be This Dropdown's value.
As soon as the dropdown has a value, that value is immediately copied into our previous_tool_slug custom state, ready for the first change.

Step 3: Handle the change
We'll create a workflow that triggers every time the user changes the dropdown, runs our JavaScript, and then updates our custom state.
-
Go back to the "Design" tab and select your dropdown element.
-
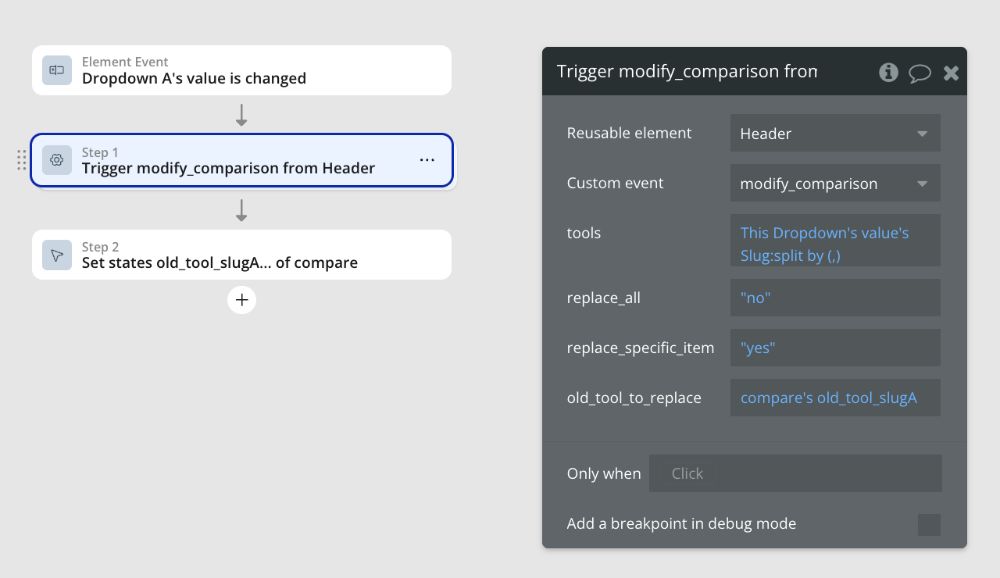
In the property editor, click the "Start/Edit workflow" button. This will create a workflow with the trigger "When an input's value is changed".
-
Action 1: Run the JavaScript.
- Add an action to this workflow. If you are using the "Toolbox" plugin, this will be "Plugins" -> "Run javascript".
- Paste the complete JavaScript code into the code box.
- Now, we must set the dynamic values at the top of the script. This is where we use both the dropdown's new value and our stored old value.
// DYNAMIC VALUES - BUBBLE WILL FILL THESE IN
const replace_all = 'no';
const replace_specific_item = 'yes';
const tool_slug_input = 'THIS IS THE NEW VALUE'; // <-- We'll replace this
let old_tool_slug_to_replace = 'THIS IS THE OLD VALUE'; // <-- and this
// ... rest of the script
In the Bubble action properties for "Run JavaScript," you will replace the placeholder text with dynamic Bubble data:
- For THIS IS THE NEW VALUE, use the dynamic expression: This Dropdown's value.
- For THIS IS THE OLD VALUE, use the dynamic expression for our custom state:
pagename's previous_tool_slug.
-
Action 2: Update the "memory" for the next change.
-
This must be the second action in the same workflow.
-
Click "Add another action..." and choose "Element Actions" -> "Set state".
-
Configure it just like in Step 2, but with one key difference:
- Element: Your page.
- Custom state:
previous_tool_slug. - Value: This Dropdown's value.
-
This action takes the new value that was just selected and saves it to our custom state, overwriting the old one. Now, previous_tool_slug is up-to-date and ready for the next time the user changes the dropdown.

Workflow summary
Here is the complete logic flow for when the dropdown's value is changed:
-
Trigger: User selects "Tool B" in a dropdown that previously showed "Tool A".
-
Workflow starts:
-
Action 1 (Run JavaScript):
old_tool_slug_to_replaceis set to pagename's previous_tool_slug (which currently holds the slug for "Tool A").tool_slug_inputis set to This Dropdown's value (which is now the slug for "Tool B").- The script runs, finds "Tool A" in localStorage, and replaces it with "Tool B".
-
Action 2 (Set State):
- The custom state
previous_tool_slugis updated to become the slug for "Tool B".
- The custom state
-
-
Workflow ends: The system is now waiting. If the user changes the dropdown again (e.g., to "Tool C"), the previous_tool_slug will correctly provide "Tool B" as the old value.
You have now successfully built a robust system for tracking changes and performing specific replacements in your data.
ABOUT ME
I'm Juliet Edjere, a no-code professional focused on automation, product development, and building scalable solutions with no coding knowledge.
Learn from practical examples and explore the possibilities of no-code, AI and automation. We'll navigate the tools, platforms, and strategies, one article at a time!
Visit my website → built with Carrd