How to send data & trigger workflows from JavaScript into Bubble (tutorial)
Bubble is great for building powerful web apps visually, but sometimes you need to dip into code for specific tasks.
In this scenario, JavaScript is running, possibly fetching data or performing complex calculations... but how do you get that information back into your Bubble app? How do you tell Bubble that something happened in your code?
In this tutorial, we’ll solve the challenge of running server-side scripts just to get data back, or trying clunky workarounds, and create a smooth, two-way street between custom JavaScript and Bubble's backend logic and data. The Javascript to Bubble element directly solves this problem: sending data and triggering events from your JavaScript code right into your Bubble page.
Let's break down how this works, why it's so useful, how to use it effectively, and how to handle multiple data points or coordinate events with values.
What is the "Javascript to Bubble" element?
At its core, the Javascript to Bubble element acts as a bridge. You place it on your Bubble page, configure a few settings, and it creates a global JavaScript function that you can call from anywhere in your client-side code (like in an HTML element with script tags, a plugin, or even the "Run JavaScript" action).
When you call this function from your JavaScript, it can:
- Send a value back to the element on the Bubble page, making that data available for dynamic display or use in workflows.
- Trigger a custom workflow event in your Bubble app, allowing you to kick off Bubble logic based on something happening in your JavaScript.
Let's set it up.

Getting started
-
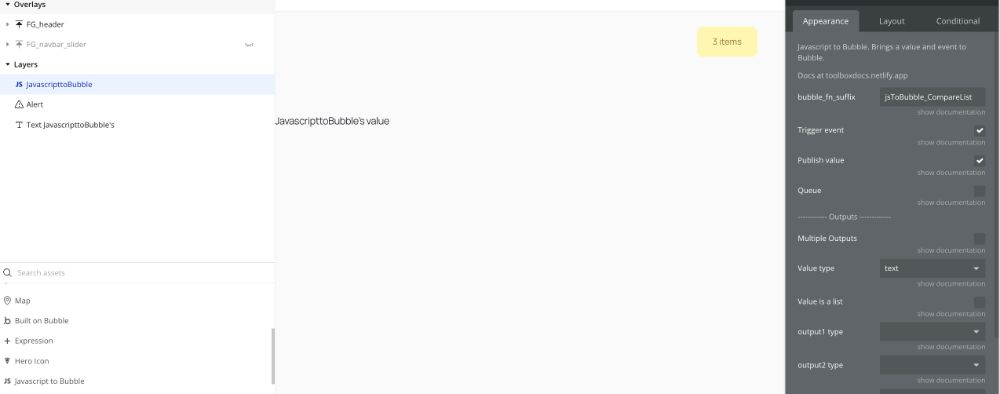
Add the Element: Find the "Javascript to Bubble" element in your element toolbox and drag it onto your page or reusable element.
-
Make it visible (Important): This is the most common pitfall. The element needs to be visible on the page when it loads so it can initialize itself and read its properties. Don't worry about it taking up space – you can resize it to be tiny (like 1x1 pixel) and place it off-screen or in a corner where users won't see it. Just ensure "This element is visible on page load" is checked.
-
Give it a name: Like any Bubble element, give it a descriptive name (e.g., jsToBubble_DataHandler, jsTrigger_StatusUpdate).
-
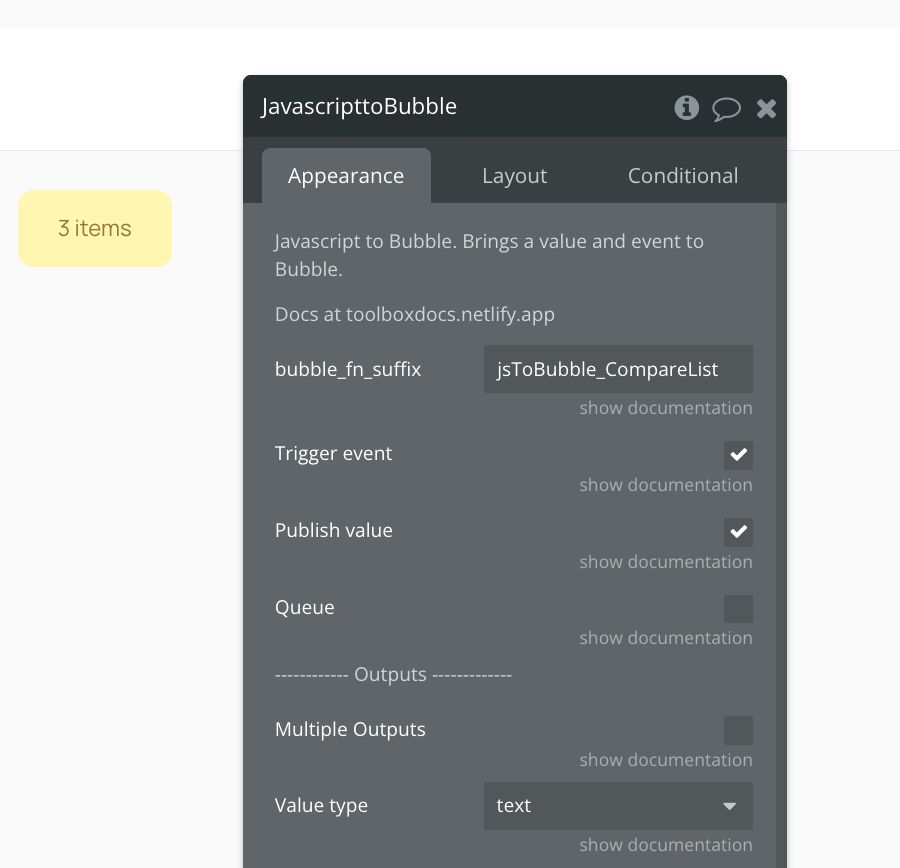
Set the bubble_fn_suffix: This is where you define the name of the JavaScript function it will create. Whatever text you put here will be appended to bubble_fn_ to form the global function name.
- Example: If you set bubble_fn_suffix to myAction, the element creates a JavaScript function called bubble_fn_myAction().
Okay, the basic setup is complete. Now you have a callable function. Let's try sending some data.
Send a single value back to Bubble
Let's say your JavaScript code determines a user's screen width and you want to store that in Bubble.
-
In the element's properties:
- Set bubble_fn_suffix to something like screenWidth.
- Check the box Publish value if set.
- Set Value type to number. (Or text, yes/no, etc., depending on what you're sending). If you expect a list, check Value is a list and set Value type accordingly.
-
In your JavaScript code:
-
Wherever you have the screen width value (let's say it's in a variable
currentScreenWidth), call the function created by the element:// Example: Getting screen width and sending it let currentScreenWidth = window.innerWidth; // Call the Bubble function (assuming suffix is 'screenWidth') bubble_fn_screenWidth(currentScreenWidth); // Example: Sending text // bubble_fn_screenWidth("User is viewing on a large screen"); // Example: Sending a list of numbers // bubble_fn_screenWidth([100, 200, 300]); -
Important: The parameter you pass into the bubble_fn_... function is the value that the element will receive.
-
-
In Bubble:
- You can now access this value dynamically anywhere you can reference the element. Look for [Your js2bubble Element's name]'s value.
- So, you could have a Text element displaying jsToBubble_DataHandler's value to show the screen width.
That’s it. You've successfully sent data from JavaScript to your Bubble page.

Trigger a workflow
Often, you don't just want to display data; you want to do something with it – like save it to the database, trigger an API call, or navigate. This is where triggering a workflow comes in.
-
In the element's properties:
- Keep your bubble_fn_suffix (e.g., myAction).
- Check the box Trigger event if set.
- (Optional but recommended: Keep Publish value if set checked if your workflow needs the value sent).
-
In your JavaScript code:
-
Call the function just like before:
// Assuming suffix is 'myAction' and you're sending a status text bubble_fn_myAction("processing_complete"); -
Calling this function now does two things: it updates the element's value (if the Publish value is checked) and triggers a custom event.
-
-
In Bubble:
-
Go to the Workflow tab.
-
Click "Click here to add an event...".
-
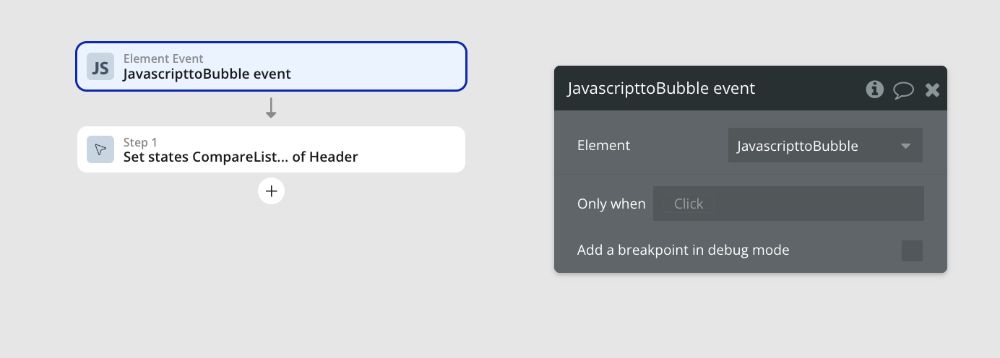
Select "Elements" > "An Element is clicked".
-
Crucially, in the event properties panel, select your js2bubble element from the dropdown. The event name will be [Your element name] - Event.
-
Now, add steps to this workflow. You can access the value sent from JavaScript using [Your js2bubble Element's name]'s value.
-
Example Workflow:
- Step 1: Make changes to a Thing (e.g., Update the current user's status).
- Field: Status = [Your js2bubble Element's name]'s value (which would be "processing_complete" in our example).
-
You can now run complex client-side JS logic and have it directly control your Bubble workflows.

Handling multiple data points (Multiple Outputs)
What if your JavaScript gives you back not just one piece of data, but several related pieces? Like a user's name, age, and preferred language? Sending them one by one with separate element calls would be messy.
The Multiple Outputs feature is designed for this.
-
In the element's properties:
-
Set your bubble_fn_suffix (e.g., userProfile).
-
Check the box Multiple Outputs.
-
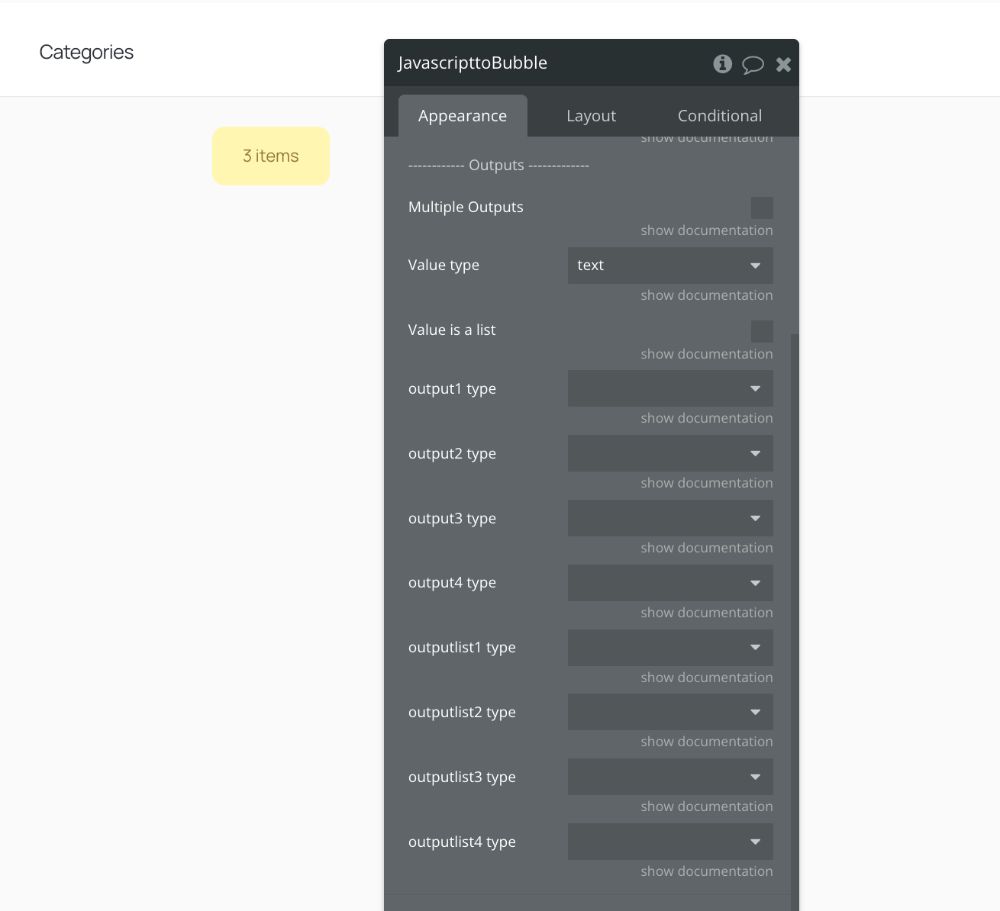
Now you'll see properties like output1 name, output1 type, output2 name, output2 type, etc.
-
Define the outputs you expect from your JavaScript:
- output1 name: userName, output1 type: text
- output2 name: userAge, output2 type: number
- output3 name: userLanguage, output3 type: text
-
(Optional: Check Publish value if set and Trigger event if set if you need these actions based on receiving the multi-output data).
-
-
In your JavaScript code:
-
When calling the function, you need to pass an object. The keys of this object must exactly match the output[n] name values you defined in the element properties.
let userDetails = {
    userName: "Jane Doe",
    userAge: 30,
    userLanguage: "English"
};

// Call the Bubble function (assuming suffix is 'userProfile')
bubble_fn_userProfile(userDetails);

// Example with potentially missing data (Bubble outputs will be empty/default)
// bubble_fn_userProfile({ userName: "John Smith", userAge: 45 });
-
-
In Bubble:
-
You can now access each specific output dynamically:
- [Your js2bubble Element's name]'s userName
- [Your js2bubble Element's name]'s userAge
- [Your js2bubble Element's name]'s userLanguage
-
If you triggered an event, you can use these specific outputs directly within the workflow steps.
-
This is a game-changer for passing structured data from complex client-side operations.

Queue: Sync events and values
Here's a potential problem you might encounter: You call your bubble_fn_... function quickly multiple times. Each call triggers the event (if enabled). Your workflow starts running. But what if the workflow takes a moment to process, and another event fires with a new value before the first workflow finishes? The workflow might pick up the latest value on the element, not the specific value that was sent with its triggering event.
This is where the Queue comes in. It ensures that events and their corresponding values are processed in the order they were sent.
-
In the element's properties:
- Check the box Queue second and subsequent events and values.
- (Ensure Publish value if set and Trigger event if set are also checked if you need them).
-
In your JavaScript code:
- You call the function just like before. The difference is in how the element handles subsequent calls.
-
In Bubble:
-
The first time your JavaScript function is called (when the queue is empty), the value is updated, and the event is triggered immediately.
-
Subsequent calls from JavaScript will NOT trigger the event immediately. Instead, their values (or multi-output objects) are stored in a queue within the element. The event is suppressed until you are ready.
-
To process the next item in the queue, you must use the Dequeue element action in a workflow step.
-
When Dequeue runs:
- The next value from the queue becomes the element's current value.
- The element triggers its custom event again, specifically for this dequeued value.
- If there are no more items in the queue, the element's current value becomes empty.
-
There's also a ClearQueue action to discard any pending items and optionally clear the current value.
-
How to use the queue in practice:
This pattern is common when processing items one by one, perhaps from a list generated by JavaScript.
- Your JS finishes processing a batch and calls bubble_fn_... for the first item.
- The js2bubble element's event fires.
- Your workflow starts. The first step in this workflow should be Dequeue on the same js2bubble element.
- Any other steps in this workflow then use the element's value (which now holds the first item's data thanks to the initial trigger + the Dequeue step happening very quickly).
- When the workflow finishes, if more items are waiting in the queue, the Dequeue action you placed at the start of the workflow will process the next item.
- Processing the next item updates the value and triggers the event again, starting the workflow cycle for the next item.
- This continues until the queue is empty.
This setup ensures that each workflow run is explicitly linked to a specific value that was waiting in the queue, preventing race conditions if your JS sends data faster than your Bubble workflow can process it.
Dynamic suffixes for Repeating Elements
If you use the Javascript to Bubble element inside a Repeating Group or a reusable element that appears multiple times on a page, you'll have multiple instances of the element. If they all had the same bubble_fn_suffix, calling bubble_fn_myAction() would be ambiguous – which element should receive the data or trigger the event?
To solve this, use dynamic data in the bubble_fn_suffix property.
- In a Repeating Group: Set the suffix to something like statusUpdate_[Current cell's index] or statusUpdate_[Current cell's Unique ID]. Each element instance gets a unique function name like bubble_fn_statusUpdate_1, bubble_fn_statusUpdate_2, etc.
- In a Reusable Element: If the reusable element appears multiple times, pass a unique identifier (like a Thing's Unique ID or an index) into the reusable element as a custom state or property, and use that dynamic value in the bubble_fn_suffix.
Then, in your JavaScript, you'll need to construct the correct function name dynamically before calling it, based on the context (e.g., the index within a list you're processing).
// Example inside a loop processing items for an RG
items.forEach((item, index) => {
    // Assume your Bubble element in cell 'index' has suffix 'process_[index]'
    let functionName = "bubble_fn_process_" + index;

    // Check if the function exists before calling (good practice)
    if (typeof window[functionName] === 'function') {
        window[functionName](item.data); // Call the specific element's function
    } else {
        console.error("Bubble function not found for index: " + index);
    }
});
This makes sure your JavaScript calls the correct instance of the Javascript to Bubble element on the page.
For robust solutions, it's safer to pass simple data types (text, numbers, IDs as text) and perform the data lookups within your Bubble workflows, instead of passing the ID of a Bubble data item into the JavaScript function.
Key takeaways
- Visibility is KING: Seriously, if it's not working, double-check that the element is visible on page load and not hidden by a condition when the page loads.
- Suffix match: Ensure the bubble_fn_suffix in the element properties exactly matches the end of the function name you're calling in your JavaScript (bubble_fn_ + your suffix).
- Parameter is the value: Whatever you pass into the bubble_fn_... function is what Bubble receives as the value (or the object for multiple outputs).
- Check your types: Make sure the Value type (or output types) you set in the element properties match the type of data you're sending from JavaScript.
- Multiple Outputs = Object: Remember, for multiple outputs, you must pass a JavaScript object with keys matching the defined output names.
- The queue pattern: If you're triggering workflows and sending values repeatedly or rapidly, understand and utilize the Queue + Dequeue pattern to keep events and values in sync.
- Browser console: Use your browser's developer console (F12). JavaScript errors when calling bubble_fn_... will appear there. If the function isn't defined, the element likely didn't initialize so check visibility.
- Bubble logs: Check the Bubble server logs for any errors that might occur after the data reaches Bubble (e.g., errors in your workflow trying to use the value).
Conclusion
The Javascript to Bubble element is an essential tool for anyone who needs to bridge the gap between client-side JavaScript and their Bubble application's data and workflows. Whether you're integrating with external JS libraries, performing complex calculations, or capturing specific browser information, this element provides a clean, direct way to communicate back to Bubble.
By understanding how to set the suffix, publish values, trigger events, handle multiple outputs, and leverage the queue for precise control, you unlock a whole new level of possibility for your Bubble applications.
ABOUT ME
I'm Juliet Edjere, a no-code professional focused on automation, product development, and building scalable solutions with no coding knowledge.
Learn from practical examples and explore the possibilities of no-code, AI and automation. We'll navigate the tools, platforms, and strategies, one article at a time!
Visit my website → built with Carrd