How to manage shared state in Bubble using custom events across pages
Bubble is a powerful tool for building web applications without code. However, managing an application state that needs to be consistent and easily accessible across different pages can sometimes feel challenging, especially in single-page application (SPA) style builds. How do you ensure that an action taken on Page A instantly updates a list displayed on Page B, or that a filter setting selected on your homepage persists when the user navigates to a search results page?
While Bubble offers various methods for state management (like database fields, custom states, URL parameters, and Option Sets), achieving a truly shared, dynamic state across multiple pages often requires a more robust approach than simply passing data on navigation. This is where leveraging Bubble's Custom Events with URL parameters becomes powerful.
This tutorial will show you how to build a system where updating the state on one page can effectively "trigger" updates or actions on another page using custom events, creating a more seamless and reactive user experience.
Why standard state isn't always enough
Bubble's standard methods work well for many scenarios:
- Custom States: Excellent for temporary page-specific states (like showing/hiding elements, and tracking form steps). They reset on page load.
- Database: The source of truth for persistent data. Updating the database on one page means the next time another page loads and queries that data, it will be current. But it doesn't proactively tell other already loaded pages to update.
- URL Parameters: Great for passing specific data during navigation (e.g., the ID of an item to display on a detail page). You can use URL parameters to set the initial state on page load, but they don't react to changes happening after the page has loaded from another page.
The challenge arises when you want an action on Page A to cause an immediate or easily triggered reaction on Page B, without Page B needing to be fully reloaded or constantly polling the database.
The power of custom events
Custom Events in Bubble are reusable workflows. You define a sequence of actions, give it a name (the event name), and potentially define the data it accepts. You can then trigger this Custom Event from various workflows within the same page.
They are great for:
- Organizing complex workflows into logical units.
- Creating reusable blocks of actions.
- Making workflows more readable.
However, a Custom Event defined on Page A cannot be directly triggered from Page B. So, how do we use them for cross-page state management? By using URL parameters as the trigger mechanism for Custom Events defined on the target page.

Strategy: URL parameters + custom events
The core idea is this:
- An action happens on Page A that modifies shared state (e.g., adding an item to a list).
- Instead of just updating the database, Page A navigates to the target page (Page B) using the "Go to page" action.
- Critically, Page A passes the relevant state information (e.g., the updated list of item IDs, or a flag indicating a change occurred) to Page B using URL parameters.
- On Page B, a workflow is set up to detect these specific URL parameters when the Page is loaded.
- If the required URL parameters are found, this "Page is loaded" workflow triggers a Custom Event defined on Page B.
- The Custom Event on Page B contains the logic to update the page's elements (e.g., refresh a repeating group, and show a confirmation message) based on the data received via the URL parameters.
This makes the Custom Event on Page B the central point for handling incoming "state updates" initiated from other pages.
Step-by-step tutorial
Let's walk through a common example: managing a user's "comparison list" where items can be added or removed from different product pages, and a dedicated "Comparison Page" needs to always display the current list.
Scenario:
- We have a Product Data Type.
- Users can click the "Add to Comparison" buttons on various product listings or detail pages.
- A User Data Type has a list field, comparison_items (List of Products).
- We have a dedicated page, comparison_page, that displays the items in the current user's comparison_items list using a Repeating Group.
Goal: When a user adds/removes an item on a product page and then navigates to the comparison_page, the comparison_page should reliably load and display the latest list, potentially highlighting recent changes or triggering a refresh animation.
Step 1: Set up the data structure
- Create a Data Type Product with fields like name (text), description (text), etc.
- Add a field to the built-in User Data Type called comparison_items (List of Products).
Step 2: Implement Add/Remove logic on product pages
On your product listing or detail pages, create workflows for "Add to Comparison" and "Remove from Comparison" buttons:
-
Add to Comparison workflow:
- Action 1: Make changes to a thing -> Current User.
- Change another field: comparison_items -> add the Current cell's Product (or the specific product being viewed).
- (Optional but recommended) Action 2: Display the message or change the button state to indicate success.
-
Remove from Comparison workflow:
- Action 1: Make changes to a thing -> Current User.
- Change another field: comparison_items -> remove the Current cell's Product (or the specific product being viewed).
- (Optional) Action 2: Display message or change button state.
Step 3: Design the comparison page (comparison_page)
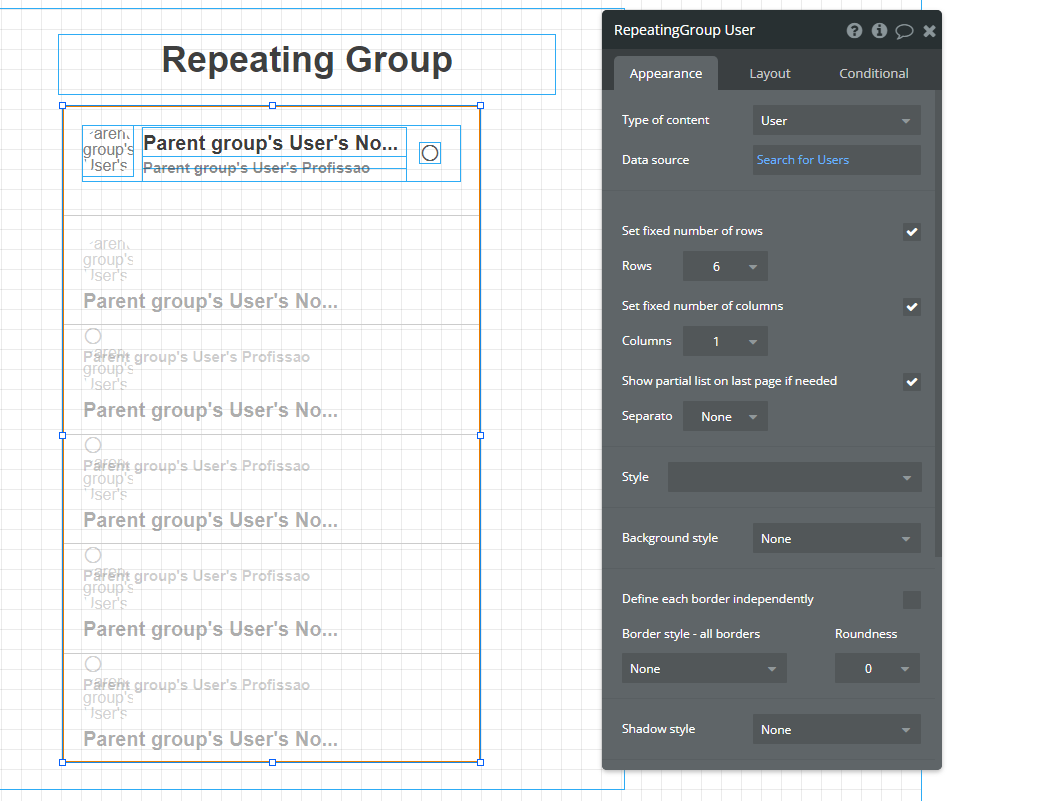
- Add a Repeating Group that displays Products.
- Set the Data Source of the Repeating Group to the Current User's comparison_items. This ensures it eventually shows the right data once the page loads and the user is identified, but doesn't react dynamically to changes made on other pages unless the page is reloaded or updated.
Step 4: Create the custom event on the comparison page
Now, let's add the mechanism to handle updates triggered from other pages.
-
Go to the comparison_page workflow tab.
-
Click "Click here to add an event..." -> "Custom Event".
-
Name the event something descriptive, like update_comparison_display.
-
You can add a "Type of data" for the Custom Event if you need to pass specific information (e.g., the ID of the item just added/removed, or a flag indicating what kind of update happened). For this example, let's add a Data Type text and name it status (we might pass "added" or "removed").
-
Inside the update_comparison_display Custom Event workflow, add the actions needed to refresh or update the page elements. For our Repeating Group displaying the comparison items:
- Action 1: Element Actions -> Display list -> RepeatingGroup Products.
- List to display: Current User's comparison_items. (This explicit refresh can sometimes be necessary to ensure the Repeating Group updates immediately, although often changing the data source of the page/group is enough - but this is a robust way to ensure it).
- (Optional) Action 2: Use the status data from the Custom Event to show a temporary message ("Item added successfully!") or highlight the relevant item in the list.
- (Optional) Action 3: Scroll to the updated item or the top of the list.
Step 5: Trigger the navigation with URL Parameters from product pages
Go back to your product pages where the "Add to Comparison" and "Remove from Comparison" workflows are. After the step where you modify the user's comparison list in the database, add a navigation step:
-
After the database change action:
-
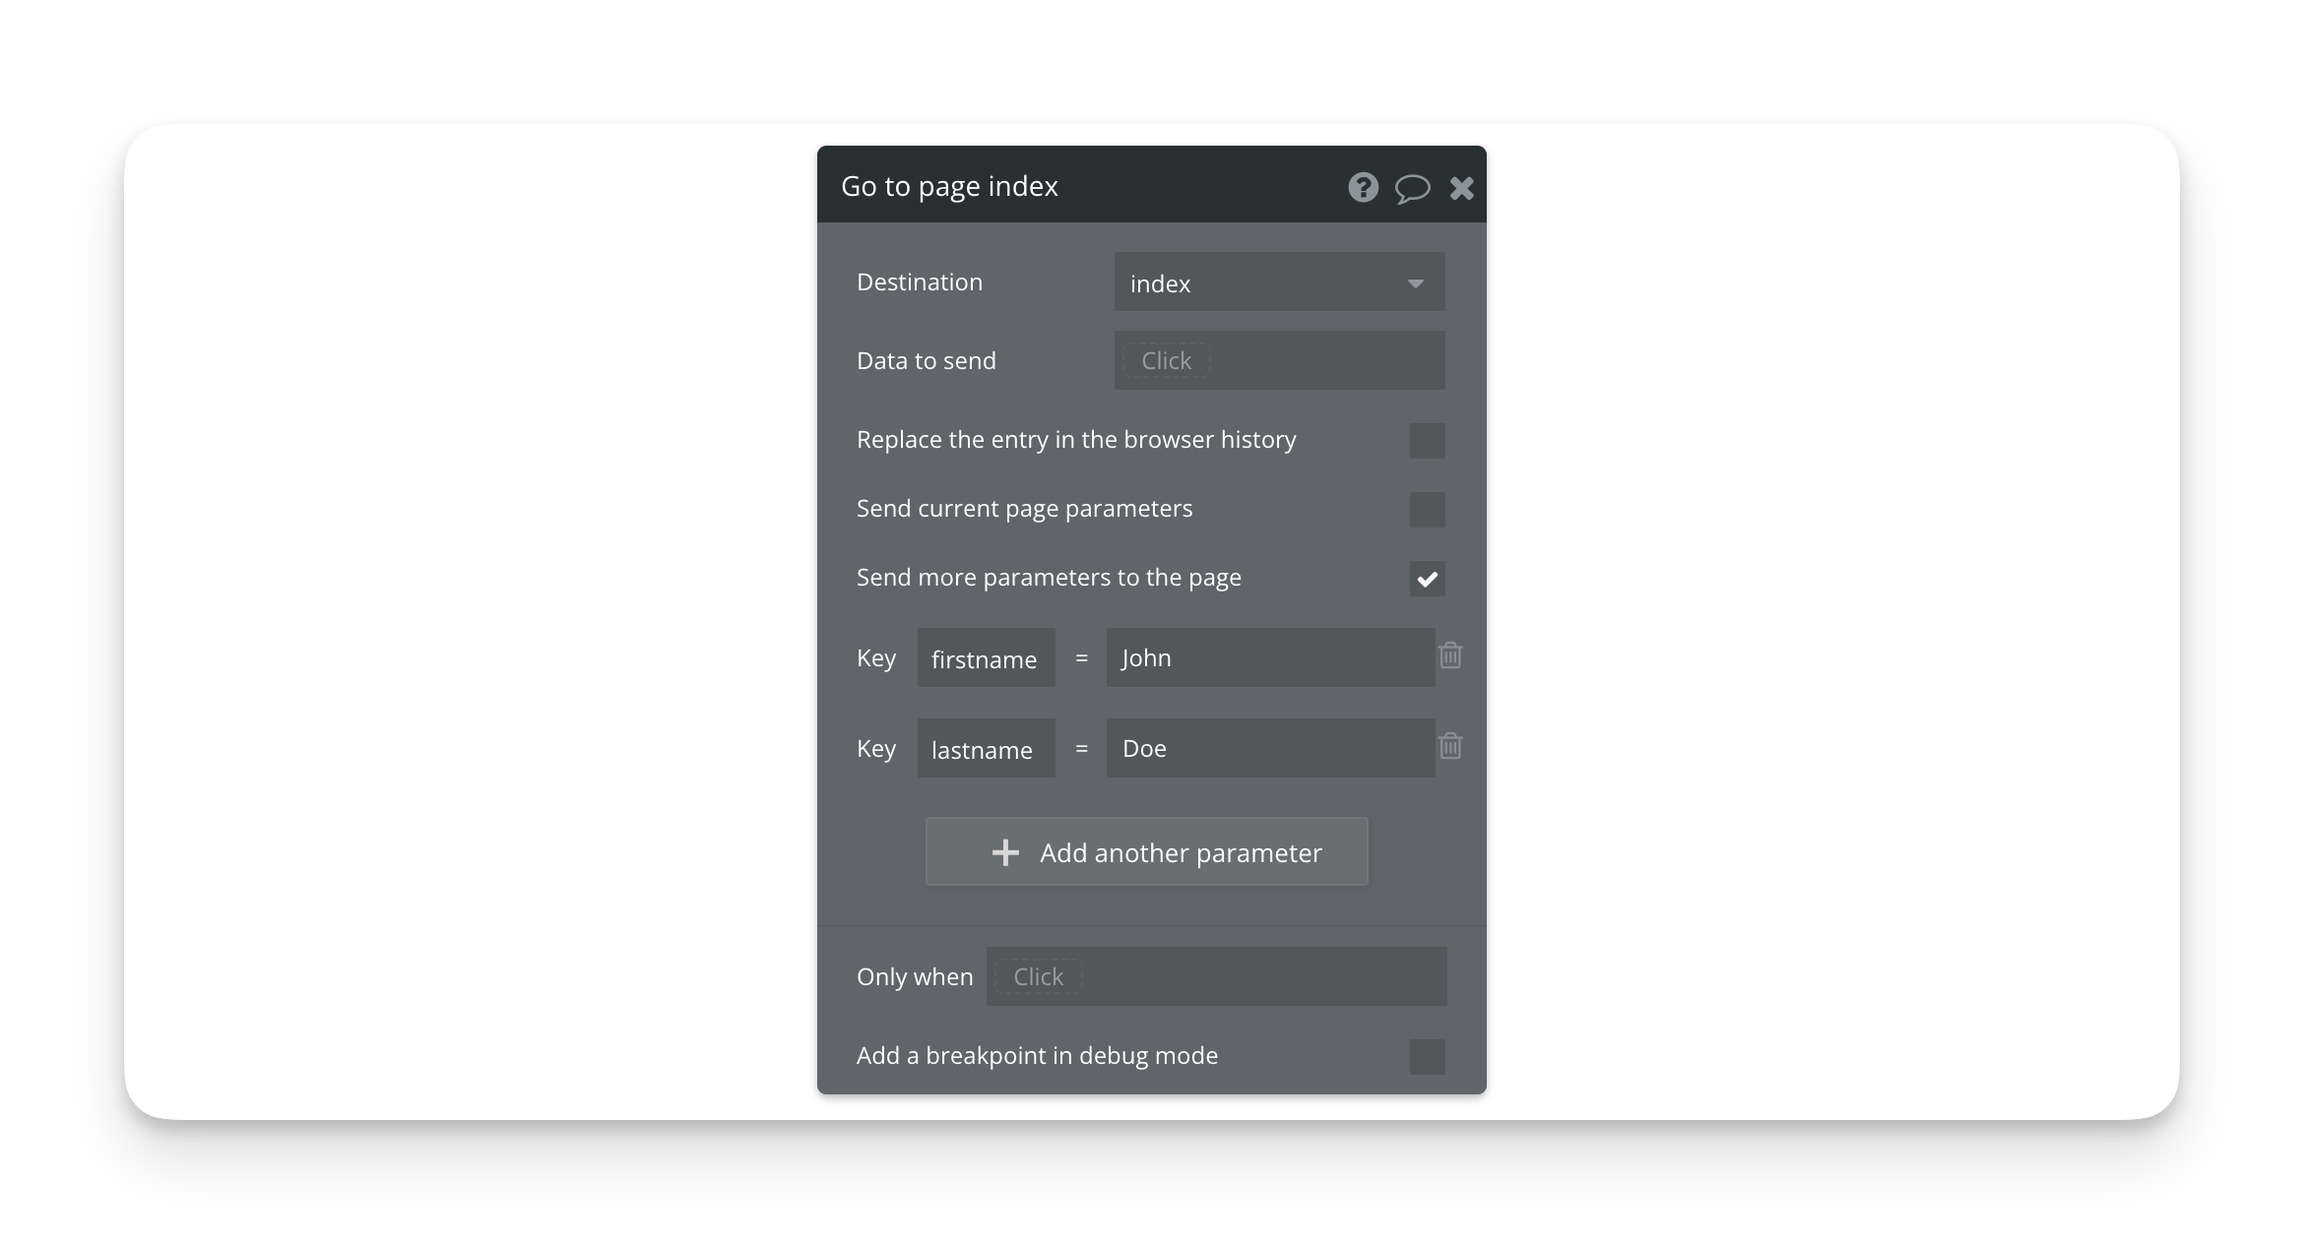
Action: Navigation -> Go to page.
-
Destination page: comparison_page.
-
Check "Send more parameters to the page".
-
Define a parameter:
- Key: comparison_updated (or similar)
- Value: yes (or a timestamp, or the ID of the item changed, depending on what data your Custom Event needs). For our simple example, passing yes is enough to indicate an update occurred. You could also pass the status (added/removed) here.
- Example: Key: update_status, Value: "added" (if adding) or "removed" (if removing).
-
Step 6: Trigger the custom event on the comparison page load
Finally, set up the workflow on comparison_page to detect the URL parameter and trigger the Custom Event.
-
Go to the comparison_page workflow tab.
-
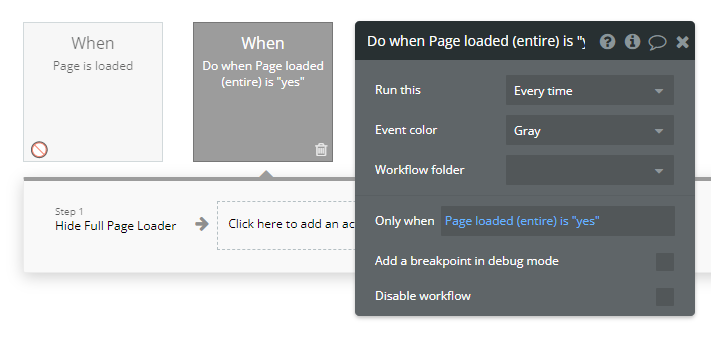
Click "Click here to add an event..." -> "General".
-
Select the event "Page is loaded".
-
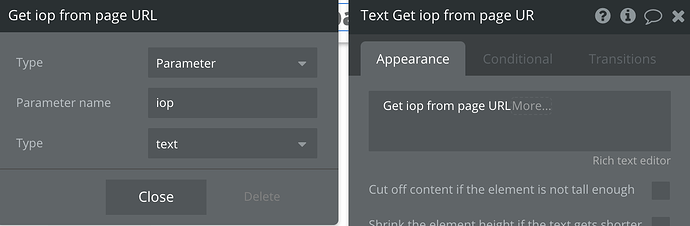
Add a condition to this workflow: "Only when Get comparison_updatedfrom page URL isyes`" (or check for the presence of your chosen parameter).
-
Inside this conditional "Page is loaded" workflow:
- Action: Element Actions -> Trigger a Custom Event.
- Select the update_comparison_display Custom Event you created.
- If your Custom Event accepts data (status), pass the value from the URL parameter here: Get update_status from page URL.
-
 How it Works Together:
Now, when a user clicks "Add to Comparison" on a product page:
- The user's comparison_items list in the database is updated.
- The workflow navigates the user to the comparison_page.
- Crucially, the URL includes a parameter like ?comparison_updated=yes.
- When comparison_page loads, the "Page is loaded" workflow runs.
- It detects the comparison_updated=yes parameter.
- This triggers the update_comparison_display Custom Event on the comparison_page.
- The Custom Event's workflow executes, explicitly telling the Repeating Group to refresh its data source (Current User's comparison_items), ensuring it displays the latest list. Optional actions like showing a message based on the status parameter also run.
This creates a reactive feel, as the comparison list updates seemingly in response to the user landing on the page with the update intention encoded in the URL.
Considerations and enhancements
- Data security: Avoid passing sensitive data directly in URL parameters. For complex states, pass a unique identifier (like a user ID or a temporary state ID) and have the target page retrieve the full state securely (e.g., from the database).
- URL length limits: Be mindful of URL length limits if you're passing large amounts of data. Passing just an ID or a flag is usually best.
- Alternative triggers: While URL parameters are great for navigation-based triggers, you could explore backend workflows if you need real-time updates pushed to multiple active users on different pages (this is more advanced and often involves server-side events or polling, which goes beyond simple custom event triggering).
- Custom state on target page: Instead of immediately triggering the Custom Event on page load, you could use the URL parameters to set a Custom State on the target page first. Then, other elements or workflows on that page could be conditionally triggered based on that Custom State's value. This adds flexibility.
- Resetting URL parameters: If you don't want the Custom Event to trigger again if the user simply refreshes the page after the initial navigation, you might need logic to clear the relevant URL parameters after the Custom Event has run. This can be done with plugins or by navigating to the same page without the parameters, which is often overkill. For most cases, letting it trigger on subsequent loads with the parameter is fine, as the update logic should be idempotent (running it multiple times has the same result as running it once).
Conclusion
By combining the navigation power of URL parameters with the reusable workflow logic of Custom Events, you can build a robust and maintainable system for managing shared state and triggering dynamic updates across different pages in your Bubble application. This technique moves beyond simple data passing and allows you to orchestrate complex interactions, resulting in a more professional and responsive user experience.
ABOUT ME
I'm Juliet Edjere, a systems thinker focused on how AI changes operations, how organisations evolve, how workflows break down, and on building scalable solutions.
I help organisations redesign workflows, operations, and knowledge systems for the AI era. All things: systems thinking, operational design, AI-era workflows, knowledge infrastructure
Visit my website → built with Carrd
Other Posts