When to use n8n's HTTP batch request vs Loop Over Items nodes
In this post, we’ll explore the practical application of two key n8n nodes: the HTTP Request node and the Loop Over Items node. We'll cover their distinct functionalities, common challenges such as rate limiting and handling large datasets, and provide a problem-solving approach to building robust and performant workflows.
HTTP Node Batching sends multiple requests in parallel per batch, not truly one at a time. Faster, but risks overload.
Loop Over Items sends one request at a time in strict sequence, waits for response before moving to the next.
HTTP batch request vs. Loop Over Items
Before we dive into practical scenarios, it's important to grasp the fundamental difference between how the HTTP Request node handles multiple items versus the controlled iteration of the Loop Over Items node. This difference is key to preventing API overloads and optimising your workflow's performance.
- HTTP Node Batching (Implicit parallelism): When the HTTP Request node receives multiple input items (e.g., from a Spreadsheet or Read CSV node), it attempts to send requests for these items in parallel, or in "batches." While this can be significantly faster for many use cases, it's not truly one request at a time. The node processes a predefined number of items concurrently before moving to the next batch. This can lead to issues like API rate limits if the batch size or the API's concurrency limits are not properly managed.
- Loop Over Items (Strict sequential processing): In contrast, the Loop Over Items node is designed for strict sequential processing. It takes a defined "batch size" of items, but still processes them one at a time per iteration of the loop, from its input, passes it through a series of subsequent nodes, waits for the entire sub-workflow within the loop to complete, and then moves to the next item. This "one-at-a-time" approach provides granular control, making it ideal for scenarios where rate limiting is a concern or when the order of operations for individual items is critical.
Scenario 1: Avoiding API rate limits with controlled batching
Imagine you need to process a large list of customer emails by sending them to an email validation API. This API has a strict rate limit of 10 requests per second. Directly feeding all emails into an HTTP Request node would quickly hit this limit, resulting in errors.
We have to implement controlled batching using the HTTP Request node's built-in batching options.
Workflow design:
- Start node: Triggers the workflow (e.g., a "Manual Trigger" for testing, or a "Cron" node for scheduled execution).
- Configure the node to read your list of emails: Let's assume this node outputs items with a
emailfield. Ensure your data is structured correctly. Map the email column to an appropriate field name, if required. - Configure the HTTP Request node: Configured to interact with the email validation API.
-
-
Method: Typically
POSTorGETdepending on your API. -
URL: The endpoint for your email validation API. You'll likely use an expression to dynamically insert the email from the previous node:
https://api.emailvalidator.com/validate?email={{ $json.email }}(Adjust based on your API's documentation).Always refer to the API documentation for specific rate limit details, recommended batch sizes, and any best practices for making requests.
-
Authentication: Set up credentials as required by your API (e.g., "Predefined Credential Type" or "Generic Credentials" with Header Auth for an API key).
-
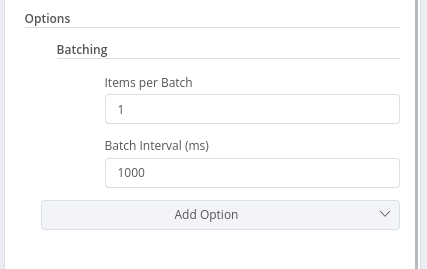
Node Options -> Batching: This is where the magic happens.
-
Items per Batch: Set this to a value lower than your API's rate limit, considering some buffer. If the API allows 10 requests/second, start with
5or8. You can adjust this based on testing.Start with a very conservative
Items per Batchand a generousBatch Interval. Gradually increaseItems per Batchor decreaseBatch Intervalwhile monitoring for rate limit errors. -
Batch Interval: Enter a value in milliseconds to introduce a delay between batches. For a 10 requests/second limit, a batch of 5 requests would need at least a 500ms (0.5 second) interval if the processing time for each request is negligible. If you set
Items per Batchto 1, andBatch Intervalto 100ms, this effectively translates to 10 requests per second. Experiment to find the optimal balance for your API.
-
-
Always include a way to inspect the API's response. You can add a "Set" node after the HTTP Request node to store specific response data, or use the "Output" of the HTTP Request node directly. Look for error messages related to rate limiting (e.g., HTTP status code 429 - Too Many Requests).
For HTTP Request nodes, always set a reasonable
Timeoutin milliseconds. This prevents your workflow from hanging indefinitely if an API is unresponsive.
Scenario 2: Processing paginated API responses
Many APIs return large datasets in "pages" to avoid overwhelming the client or server. To retrieve all data, you need to make multiple requests, incrementing a page number or using a next_url provided in the response.
We need to use the HTTP Request node's built-in Pagination options.
Workflow design:
-
Start node: Triggers the workflow.
-
Configure the HTTP Request node: Configured to fetch data from the paginated API.
-
Method: Typically
GET. -
URL: The base URL of your API endpoint.
-
Authentication: Set up as needed.
-
Node Options -> Pagination:
-
Pagination mode:
-
Update a Parameter in Each Request: This is common when the API uses
pageoroffsetparameters.- Parameter Name: Enter the name of the pagination parameter (e.g.,
page,offset). - Type: Where the parameter should be set, Body, Header or Query.
- Value: The initial page number or offset (often
1or0).
- Parameter Name: Enter the name of the pagination parameter (e.g.,
-
Response Contains Next URL: This is used when the API provides a direct URL to the next page in its response.
- Next URL: Use an expression to extract the next URL from the response (e.g.,
{{ $response.body.next_page_url }}).
- Next URL: Use an expression to extract the next URL from the response (e.g.,
-
-
Limit Pages Fetched: The maximum number of pages to fetch (optional, for safety).
When initially setting up pagination, set a low "Limit" (e.g., 2-3 pages) to quickly test your configuration and verify that the
Pagination Complete Whencondition is working as expected. -
Pagination Complete When: Define a condition to stop pagination. This is important to prevent infinite loops. Common conditions include:
responseIsEmpty: Stop when thedataarray in the response is empty.receiveSpecificStatusCodes: Comma-separated values of status code(s) when complete.
-
Interval Between Requests (ms): Time in milliseconds to wait between requests. At
0no delay will be added.
-
-
Before configuring pagination, run the HTTP Request node once without pagination enabled. Examine the response body to understand how the API indicates the "next page" (e.g., a page number, an offset, a next_url field, or an empty data array). This is vital for setting the Pagination Complete When condition correctly.
If your Pagination Complete When condition relies on a specific field, consider what happens if that field is not present in the response (e.g., if an error occurs). You might need additional error handling or a more robust Pagination Complete When expression.

Scenario 3: Complex sequential processing with Loop Over Item
Sometimes, you need to perform an action for each item, but that action involves multiple API calls or complex logic where the output of one step is the input for the next, for each individual item. This is where the Loop Over Items node shines.
We need to use the Loop Over Items node to process each item sequentially through a sub-workflow.
Workflow design:
-
Start node: Triggers the workflow.
-
Configure the read data node: Reads your initial list of items (e.g., "Google Sheets" node). Ensure your data is loaded correctly. For this example, let's say you have a list of
customer_ids. -
Configure the Loop Over Items node: This is your primary control for sequential processing.
- Batch Size: For strict sequential processing (one item at a time), set this to
1. If you need to process small, fixed-size batches within the loop, you can adjust this. - Reset: Keep this off unless you have a very specific advanced use case (like pagination where you don't know the number of pages in advance). For most "process each item" scenarios,
Resetshould be off.
- Batch Size: For strict sequential processing (one item at a time), set this to
-
Build the sub-workflow (within the loop): The series of nodes that will execute for each item.
-
HTTP Request node to fetch details: Inside the loop, this node would take the
customer_idfrom the current item. URL:https://api.customers.com/details/{{ $json.customer_id }}Ensure that the data output by nodes within the loop is consistent with the expectations of subsequent nodes. Use "Set" nodes to reshape data if necessary.
-
Set node to process data: After fetching details, use a "Set" node to transform or extract specific fields from the customer details.
-
HTTP Request node to update the external system): Based on the processed data, you might make another API call to update an external system. URL:
https://api.crm.com/update-customer/{{ $json.customer_id }}- Send body: Populate the request body with the data processed in the previous "Set" node.
If the operations within your loop are resource-intensive (e.g., large file uploads), be mindful of the impact on your n8n instance's memory and CPU.
-
-
Connect the Done output: Collects the processed data after the loop completes. Connect the "Done" output of the Loop Over Items node to a node that will handle the final processed data (e.g., "Google Sheets" node to update a spreadsheet).
Error handling:
When debugging workflows with a Loop Over Items node, pay close attention to the "Executions" view in n8n. You can inspect the data flowing into and out of each node for each iteration of the loop, which is invaluable for identifying issues.
If an API call fails for a single item within the loop, the entire workflow might halt. Consider adding "Error" handling branches (using an "If Error" node or "Try/Catch" block) within the loop to log errors for individual items and allow the workflow to continue processing other items.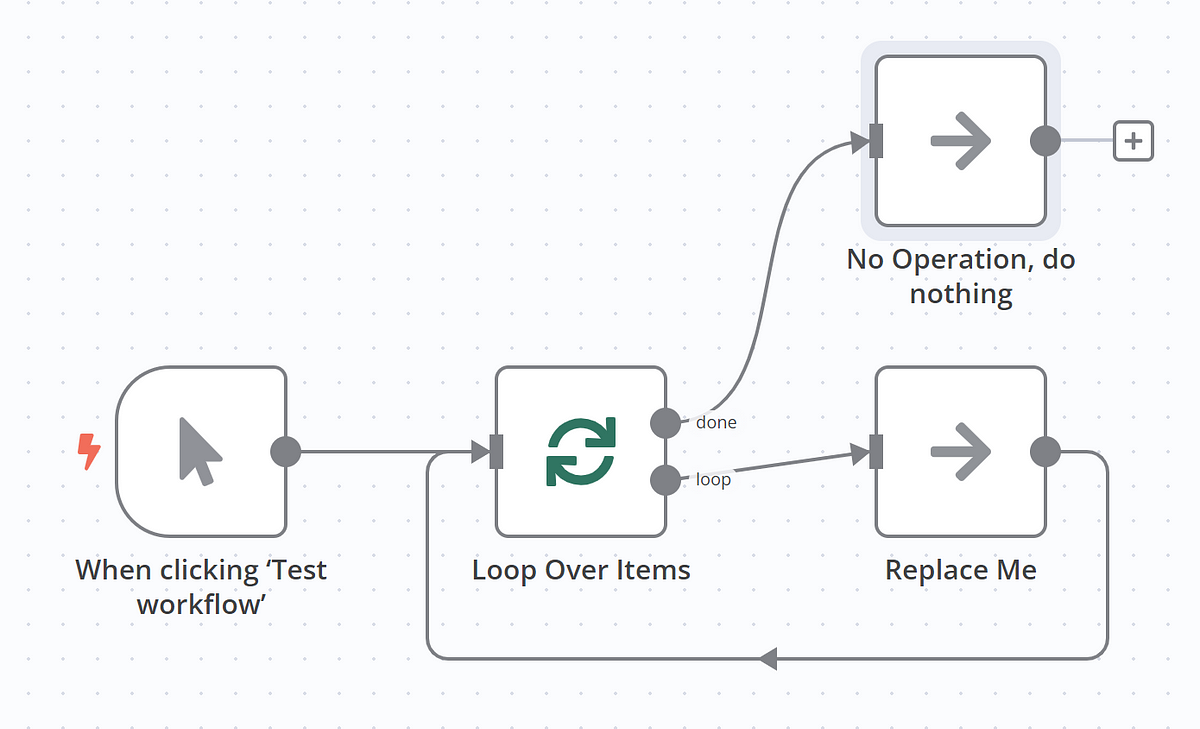
Best practices
- Concurrent execution limits: While the HTTP Request node's batching can be seen as implicit parallelism, remember that n8n itself has limits on concurrent workflow executions. If you're running many workflows concurrently, this can impact overall performance.
- Caching: For APIs with infrequently changing data, consider implementing a caching mechanism within your workflow (e.g., storing results in a database or Redis) to reduce the number of redundant API calls.
- Credential management: Always use n8n's credential management system for API keys and sensitive information. Never hardcode them directly into your nodes.
- Detailed logging: For production workflows, implement detailed logging at critical points (e.g., before and after API calls) to help with debugging and monitoring.
By understanding the nuances of the HTTP Request node's batching and the precise control offered by the Loop Over Items node, you can design and implement highly efficient, robust, and error-tolerant n8n workflows that seamlessly integrate with a wide variety of APIs.
Remember to always consult API documentation, test your workflows thoroughly, and iteratively refine your batching and looping strategies to achieve optimal performance and reliability.
ABOUT ME
I'm Juliet Edjere, a systems thinker focused on how AI changes operations, how organisations evolve, how workflows break down, and on building scalable solutions.
I help organisations redesign workflows, operations, and knowledge systems for the AI era. All things: systems thinking, operational design, AI-era workflows, knowledge infrastructure
Visit my website → built with Carrd
Other Posts