How to build a guided, AI-style multipage form in Bubble (no code)
Standard forms are a relic. They feel like a chore. But what if your form felt more like a helpful, intelligent assistant guiding your user to the perfect solution?
This is the magic of a multi-step, clustered form. By breaking down a complex query into a conversational, step-by-step flow, you can improve user trust, engagement, and the quality of the data you collect. We're not just filtering; we're simulating an AI-driven recommender that learns about the user with each step.
In this tutorial, we’ll build the front-end logic for a sophisticated, multi-step recommender flow in Bubble.
Let's get started.

Why a guided assistant flow works
Before we dive into the "how," let's understand the "why."
- Reduces cognitive load: A single form with 20 questions is intimidating. A series of 5 steps with 4 questions each feels manageable and progressive.
- Creates a conversational feel: Each step can have its introductory text, making it feel like a back-and-forth conversation. "Great, now that we know about your firm, let's talk about your tech..."
- Builds trust & momentum: As users complete each step, they feel a sense of accomplishment and are more likely to finish the entire process (this is called the "endowed progress effect").
- Simulates intelligence: By revealing questions based on previous answers (or just in a logical sequence), the system feels smarter and more tailored, even with simple logic.
The secret to a smooth, fast, multi-step form in Bubble is to build it on a single page. We won't be navigating the user to different URLs for each step. Instead, we'll have one main page and simply show and hide different Groups (our "clusters") based on the user's progress. This method is fast, efficient, and gives you a seamless user experience without constant page reloads.
Step-by-step tutorial: Build your guided flow
Step 1: Set up your page and groups
First, let's set up our main page and the groups that will act as our steps.
-
Create a new page: Let’s call it recommender.
-
Add groups: Drag a Group element onto the page for each step of your flow. Let's start with three for now. Name them clearly, for example: Group Step 1, Group Step 2, Group Step 3
-
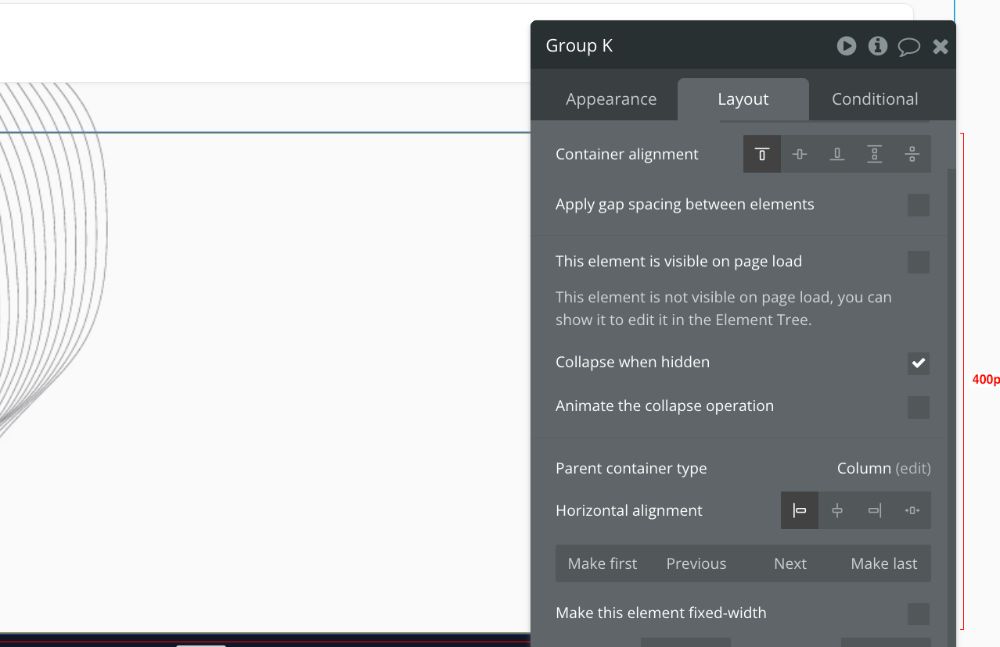
Configure each group: For every step group, you need to apply these two crucial settings in the Property Editor:
- Uncheck "This element is visible on page load." We want to control its visibility ourselves.
- Check "Collapse this element's height when hidden." This ensures that hidden groups don't leave a giant empty space on your page.
At this point, if you preview the page, it will be blank. Perfect. That’s our blank canvas.

Step 2: The custom state
How will Bubble know whether to show Step 1, Step 2, or Step 3? We need to store the current step number somewhere. The perfect tool for this is a Custom State. Think of it as a temporary variable stored in the user's browser.
-
Click on the main page element itself (the page recommender).
-
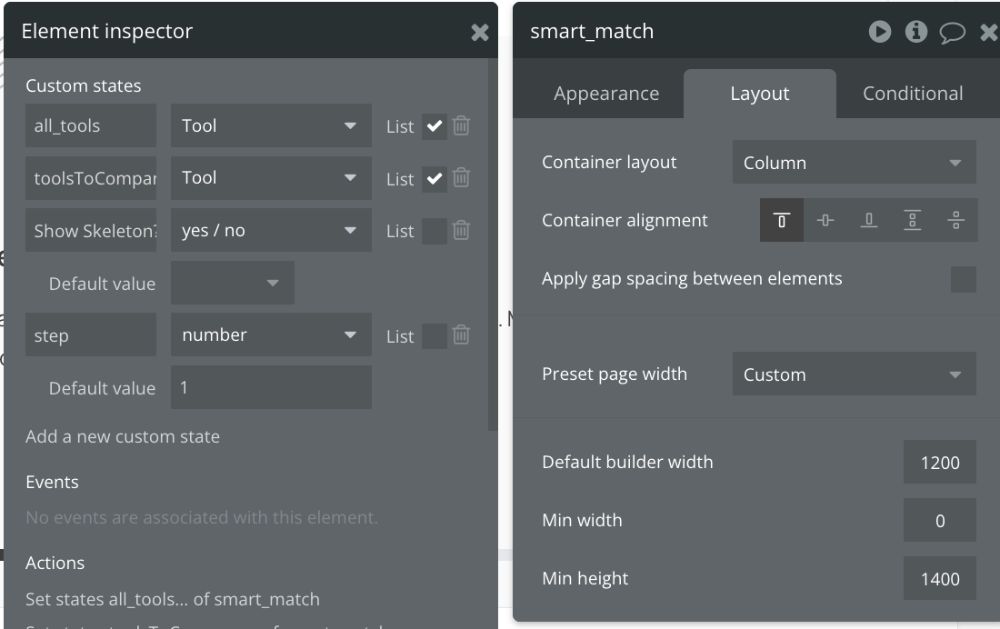
Click the small "i" icon in the top right of the Property Editor to open the Element Inspector.
-
Click "Add a new custom state."
-
Configure it as follows:
- State name: step
- State type: number
- Default value: 1 (So the form always starts on Step 1).
Now, our page has a "memory" of which step the user is on.

Step 3: Conditional visibility
This is where it all comes together. We'll tell each group to only appear when our step custom state matches its corresponding number.
-
Select Group Step 1.
-
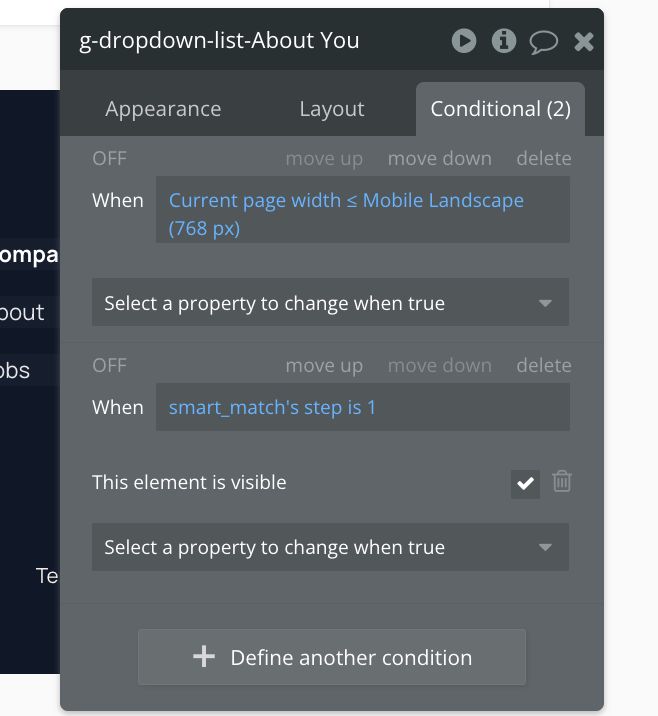
Go to the Conditional tab in the Property Editor.
-
Click "+ Define another condition."
-
Create this rule:
- When: recommender's step is 1
- Select a property to change: This element is visible
- Check the box to make it visible.
-
Repeat for all other groups, changing the number for each one:
- Group Step 2:
When recommender's step is 2->This element is visible - Group Step 3:
When recommender's step is 3->This element is visible
- Group Step 2:
Now, if you preview the page, you should see only Group Step 1, because the default value of our step state is 1.

Step 4: Navigation with "Next" and "Back” buttons
A user needs a way to move between steps. Let's add buttons.
-
Inside Group Step 1, add a Button element. Label it "Next."
-
Click "Start/Edit workflow" for the "Next" button.
-
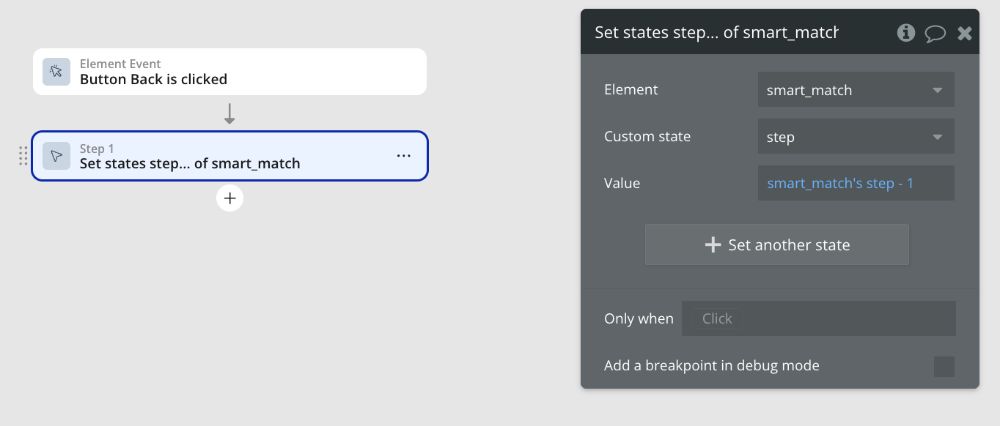
Add a new action: Element Actions -> Set State.
-
Configure the action:
- Element: recommender
- Custom state: step
- Value: recommender's step + 1
This simple expression tells Bubble to take the current value of step and add 1 to it. This will automatically hide Group 1 and show Group 2.
-
Now, inside Group Step 2, add two buttons: "Back" and "Next."
- "Next" button workflow: Set state
recommender's step = recommender's step + 1 - "Back" button workflow: Set state
recommender's step = recommender's step - 1
- "Next" button workflow: Set state
You now have a fully functional multi-step form.

Triggering the "AI" backend workflow
On your final step (Cluster 5), the "Generate My Recommendations" button won't just change the step state. It will trigger the actual matching logic.
-
In the workflow for this final button, you'll add an action: Custom Events -> Trigger a custom workflow from an API.
-
This backend workflow is where the "AI" simulation happens. It would:
- Take all the user's inputs as parameters.
- Fetch a list of all Tools or Solutions from your database.
- Run a recursive workflow (or a backend loop) to score each tool against the user's answers.
- Save the final results (e.g., a list of top 3 matches) to the User or a new Match Profile data type.
- Finally, navigate the user to a results page.
Best practices
-
Add a progress bar: Create a simple visual progress bar. Use a Group with a bright colour, and set its width conditionally. The formula would be
(recommender's step / Total Number of Steps) * 100expressed as a percentage of the container width. -
URL parameters: If you want users to be able to return to a specific step, run a workflow on page load:
- Only when:
Get data from URL's step parameter is not empty. - Action: Set state
recommender's step = Get data from URL's step(as a number). - Now you can share a link like
yourdomain.com/recommender?step=3to take someone directly to Step 3.
- Only when:
-
Input validation: On your "Next" buttons, add a condition to the workflow:
Only when Dropdown Firm Size's value is not empty. This prevents users from moving forward with an incomplete form.
By following this structure, you've moved beyond a simple form and created a powerful, engaging, and intelligent-feeling user experience—all with the no-code power of Bubble.
ABOUT ME
I'm Juliet Edjere, a no-code professional focused on automation, product development, and building scalable solutions with no coding knowledge.
Learn from practical examples and explore the possibilities of no-code, AI and automation. We'll navigate the tools, platforms, and strategies, one article at a time!
Visit my website → built with Carrd

