How to send messages as a Bot (not yourself) in n8n's Slack Node
If you've ever tried to build an n8n workflow to automate Slack messages, you've likely encountered a common issue: the messages are being sent from your personal account, not from your custom bot.
This happens because the n8n Slack node's default and "recommended" credential type, OAuth2, is designed for user-level access, not bot-level access.
This guide will walk you through the correct, detailed steps to configure your n8n workflow to post messages as your Slack bot, complete with context and troubleshooting tips.
Photo by Pankaj Patel on Unsplash
OAuth2 vs. API access token
Before we dive into the solution, it's important to understand why this happens.
OAuth2 (The "User" credential): When you use the OAuth2 credential method, you are granting n8n permission to act on behalf of your Slack user account. The credential token it receives is a user token. Therefore, any actions you perform with this token, like sending a message, will be attributed to your user profile. This is useful for workflows that need to access a user's private data or perform actions on their behalf, but it's not what you want for a bot. Doesn't work with the Slack Trigger node.
API access token (The "Bot" credential): To send messages as a bot, you need to use a Bot User OAuth Token, which is a special type of token (xoxb-) that is specifically tied to your Slack app's bot identity. This token gives n8n permission to act as the bot, and all messages sent using it will appear to come from the bot user. Required for the Slack Trigger node.
For the specific task of sending a message from a bot, the "API Access Token" method is the correct one.
Step-by-step tutorial: Configure your Slack node
Here is the detailed process to make your n8n workflow send messages as a bot.
Step 1: Set up your Slack App
If you haven't already, you need to create a Slack app for your bot.
-
Navigate to the Slack API portal.
-
Click Create an App.
-
Choose From scratch, give your app a name, and select the workspace where you want it to live.
-
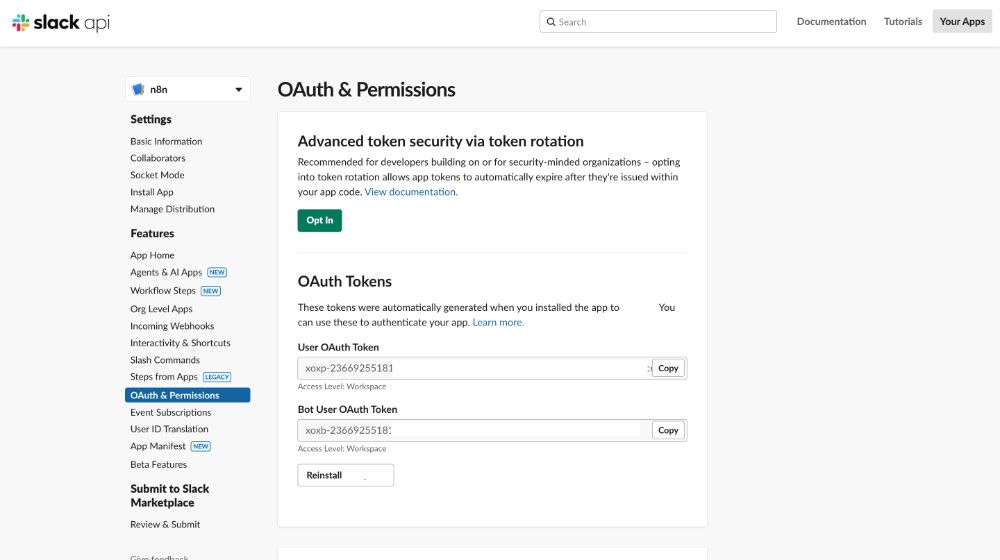
Once your app is created, go to the OAuth & Permissions section in the left-hand sidebar.
-
In the "Bot Token Scopes" section, add the necessary permissions for your bot to function. At a minimum, you'll need the
chat:writescope to allow the bot to post messages. You may also needim:writefor direct messages orapp_mentions:readif you want it to respond to mentions.If your workflow fails with an
access_deniederror, this usually means your bot token lacks the necessary permissions. Go back to your Slack app's OAuth & Permissions page and ensure you have thechat:writescope enabled. If you're trying to send a message to a private channel or a direct message, you'll need additional scopes likegroups:writeorim:write. -
At the top of the page, click the Install to Workspace button. This will generate your tokens.

Step 2: Get your Bot User OAuth Token
This is the most critical step to get the correct token.
-
On the same OAuth & Permissions page in the Slack API portal, you'll see a section titled OAuth Tokens for Your Workspace.
-
You will see two tokens:
- User OAuth Token (
xoxp-): This is the token that an OAuth2 credential would generate. We will not be using this one. - Bot User OAuth Token (
xoxb-): This is the token we need. Copy this entire token to your clipboard.
- User OAuth Token (
Step 3: Create a new n8n credential
Now, we'll configure n8n to use this bot token.
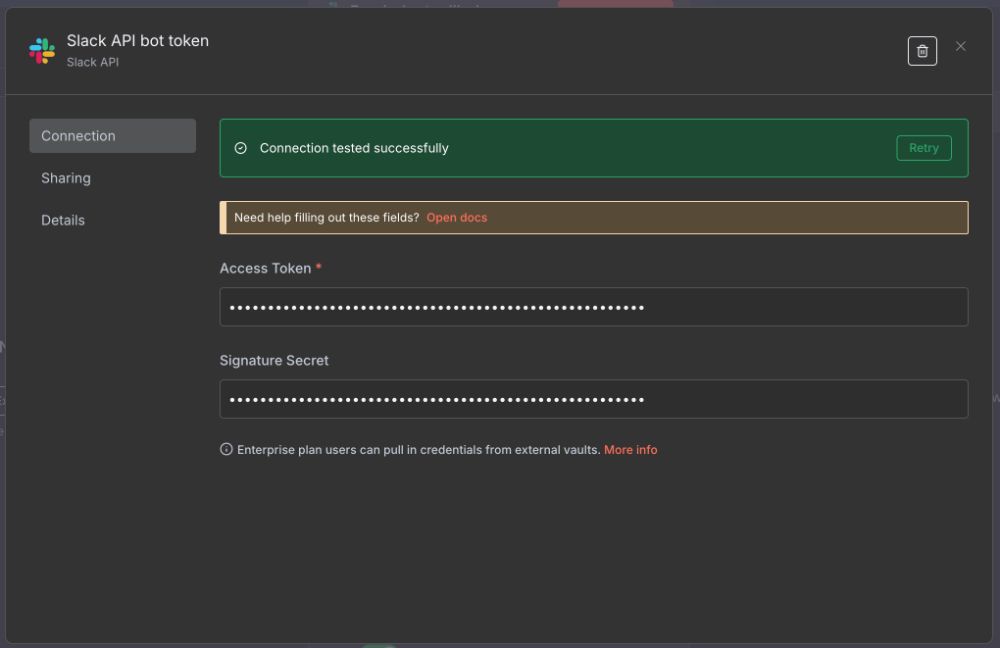
- In your n8n instance, go to Credentials and click New.
- Search for
Slackand select the Slack API credential type. - For the Authentication method, choose Access Token. This is the method that allows you to use your
xoxb-token. - Paste the Bot User OAuth Token (
xoxb-) you copied in Step 2 into the Access Token field. - The signature secret is used to verify the authenticity of requests sent by Slack. Grab your Slack Signing Secret, available in the app admin panel under Basic Info.
- Give your credential a descriptive name, like
Slack Bot Access Token, and save it.

Step 4: Configure your Slack node in the workflow
Now you can use your newly created credential in your workflow.
- In your n8n workflow, add a new Slack node.
- In the node's settings, under Credentials, select the new credential you just created (e.g.,
Slack Bot Access Token). - Configure the node as you normally would: choose the Channel and provide your Text for the message.
- Run your workflow.
The first time you run the workflow, you might not see the message in the channel. This is likely because the bot hasn't been invited to the channel yet.
Step 5: Invite your Bot to the Channel
A bot cannot post a message to a channel it is not a member of.
- Go to the Slack channel where you want the message to appear.
- In the message box, type
/invite @[YourBotName]. Replace[YourBotName]with the name you gave your app in Step 1. - Press Enter. You should see a confirmation message that the bot has been added to the channel.
- Rerun your n8n workflow, and this time the message should appear, correctly attributed to your bot.
By following this guide, you can bypass the common pitfalls of Slack integration in n8n and successfully automate messages that appear exactly as you want them, from your bot.
ABOUT ME
I'm Juliet Edjere, a no-code professional focused on automation, product development, and building scalable solutions with no coding knowledge.
Learn from practical examples and explore the possibilities of no-code, AI and automation. We'll navigate the tools, platforms, and strategies, one article at a time!
Visit my website → built with Carrd


